Wanda POS Administrator's Guide
- Done by: Fonyuy Taryuni Isidore
- Developer: IT Kamer Company Ltd.
- Date: Tuesday, 23th September 2014
- Origin PDF: Get Administrator’s Guide pdf
Administrator’s Guide Authorization Memorandum
I have carefully assessed the Administrator’s Guide for Wanda POS. This document has been completed in accordance with the appropriate requirements.
MANAGEMENT CERTIFICATION – please check the appropriate statement
- __________ The document is accepted
- __________ The document is accepted pending the changes noted
- __________ The document is not accepted
Revision sheet
| Release No. | Date | Revision Description |
| Rev. 0 | Monday, September 23, 2014 | Start administrator’s Guide |
| Rev. 1 | Wednesday, October 14, 2014 | Integration with iDempiere |
| Rev. 2 | Wednesday, October 22, 2014 | Wanda Documentation |
| Rev. 3 | Friday, October 24, 2014 | Stock Diary Management |
System requirements
Minimum system requirements
Java Runtime Environment [JRE1.6]
Recommended requirements
- Java Runtime Environment [JRE 1.8 or higher]
- iDempiere
- POS Integration Plugin for iDempiere
Downloading the Software
- Just in case you don’t have the software yet and want to download it.
- Visit the Wanda POS source forge page by clicking on the link below.
- Or download directly by clicking on the download link below.
GENERAL INFORMATION
System Overview
Wanda POS is a Point of Sale. It keeps track of all cash coming into or going out of a business by monitoring purchase of supplies and raw materials and sales of finished products. This system is extensible and suitable for all sorts of businesses, be them restaurants, stores, malls or supermarkets. It can be configured to meet the particular needs of the business in question.
Product References
| Reference | Description | Link |
| Wanda POS Support | For users who seek support on certain issues concerning Wanda POS | [ http://wandaapos.com/support.html] |
| Wanda POS Download | Link to download the latest version of Wanda POS | [ http://sourceforge.net/projects/wandaposdapos/files/latest/download?source=files] |
| Wanda POS Developers Support | For developers who are interested in working on Wanda POS | |
| Support Libraries for Wanda POS | For other libraries needed for smooth operation of WandaPOS | [ http://sourceforge.net/projects/wandaposdapos/files/] |
| Wanda POS Site | For users who want to visit the Wanda POS website | [ http://www.wandaapos.com] |
| Wanda POS wiki | For those who want to meet the real gurus behind the success of Wanda POS | [ http://sourceforge.net/p/wandaposdapos/wiki/Home/] |
Authorized Use Permission
Wanda POS is a free and open source project. It is governed by the GNU Public license. As such, anybody is free to copy any part or all of the code and modify as they please. However, whatever development made as such must be uploaded and made open source for the world to benefit from.
Points of Contact
Help Desk
| Contact Name | Contact Type | Department | Telephone | E-mail/Web |
| Redhuan D. Oon | Project guru | ERP Systems | 76781554 | red1(at)red1-dot-org |
| Dr. Stanley Mungwe | Project leader | Medical Surgery | 79910862 | sales(at)itkamer-dot-com |
| Eyog Yvon Leonce | Developer & Tester | Software Engineering | 72469067 | grandeyl(at)gmail-dot-com |
| Tatioti Mbogning Raoul | Senior Developer & Tester | Software Engineering | 70043657 | tatiotir(at)itkamer-dot-com |
| Sondi Michael Raphael | Developer & Support | Networks Engineering | 76724430 | mikaelsondi(at)gmail-dot-com |
| Fonyuy Taryuni Isidore | Developer, Support & Documentation | Software Engineering | 77952965 | Isidore(at)itkamer-dot-com |
Coordination
This is a point of sale. Hence, Wanda POS on its own not perform any accounting operation. To get this ability to perform various accounting tasks [such as tracking profits and losses and providing business/managerial advice and predictions] Wanda POS works hand-in-glove with iDempiere. IDempiere is an ERP system which Wanda POS uses to be able to perform accounting operations.
Acronyms and Abbreviations
| Abbreviation / Acronym | Meaning |
| POS – Point Of Sale | Software system that tracks all inflow and outflow of cash, how the cash moves, by whom, where, when etc. |
| ERP – Enterprise Resource Planning | Planning all financial resources well ahead of time. Takes care of all financial calculations, predictions based on present data and does all the accounting. |
| FOSS – Free and Open Source Software | Software that you can obtain free of charge and also have unlimited access to its source code. Governed by the GNU public license. E.g. iDempiere, OpenBravo POS, Wanda POS, VLC etc. |
Document Conventions
| Convention | Explanation |
| Bold | Buttons and links that appear the same as shown in the demo |
| [This is a comment ] | Any text that appears within square bracket is an aside, a comment or an explanation of the preceding concept. |
Buttons and Icons
Wanda Documentation
The documentation of Wanda POS comprises the documents listed below
- Wanda POS Installation Guide
- Wanda POS User's Guide
- Wanda POS Administrator's Guide
- Wanda POS Implementer's Guide
- Wanda POS Quick Start Guide
GETTING STARTED
Logging On
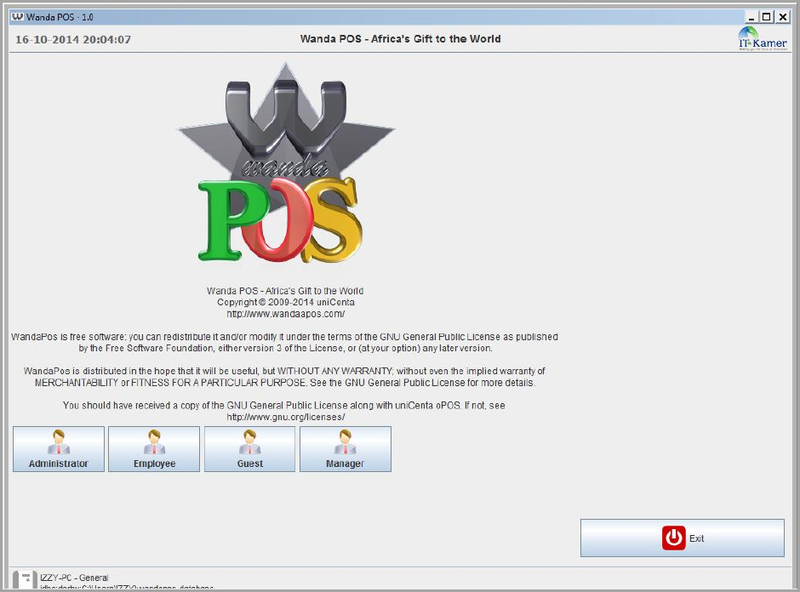
When you launch Wanda POS for the first time you will receive a message prompting you to create a database. Just click on Yes and let the software handle the database creation.
With subsequent launches your screen will be similar to the one shown below.
User Access Levels
There are four types of users who have different access levels.
Guest:
Any user in this category is able to place an order by raising a new ticket.
Employee:
Added to the abilities of a Guest user, any user in this category is able to Edit sales and make/record payments. They can also change their password.
Manager:
Added to the abilities of an Employee, any user in this category is able to manage customers, close cash, view closed cash, manage stock and manage sales.
Administrator:
Added to the abilities of a Manager, any user in this category is able to do maintenance, configurations and printer settings.
NB: When you log in your information is displayed on the bottom right corner of the screen
Changing User ID and Password
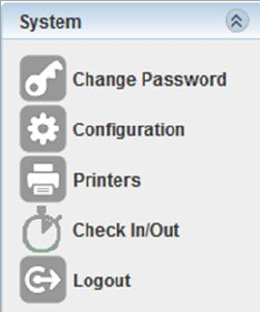
To change passwords a user must login to their account. On the system panel [left side of the screen], click on ![]() .
.
Exit System
Click on ![]() to get back to the welcome screen. It’s in the System panel on the left side of the screen. Click on
to get back to the welcome screen. It’s in the System panel on the left side of the screen. Click on ![]() to exit the system. It’s at the bottom right corner of the window.
to exit the system. It’s at the bottom right corner of the window.
USING THE SYSTEM
Quick Tour
- Horizontal Menu
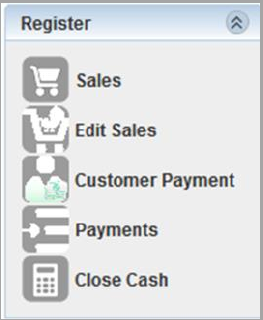
- Register Panel
- Ticket Display
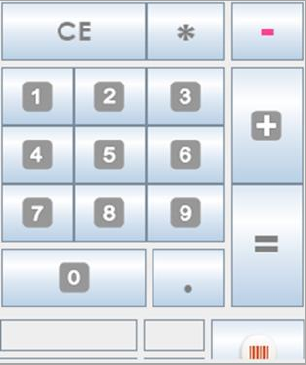
- Calculator
- Vertical Menu
- System Panel
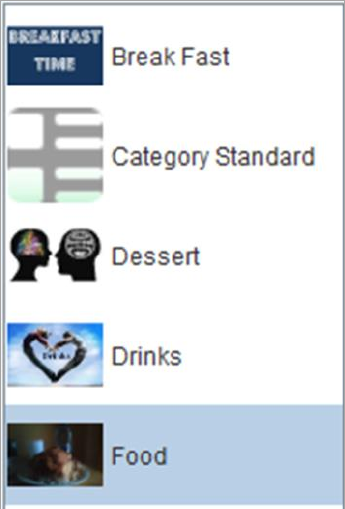
- Categories Display
- Items Display
- NB: This user guide will be approached from a user access level perspective. i.e. For any feature or functionality under demonstration, we illustrate using a user with the minimum access levels required.
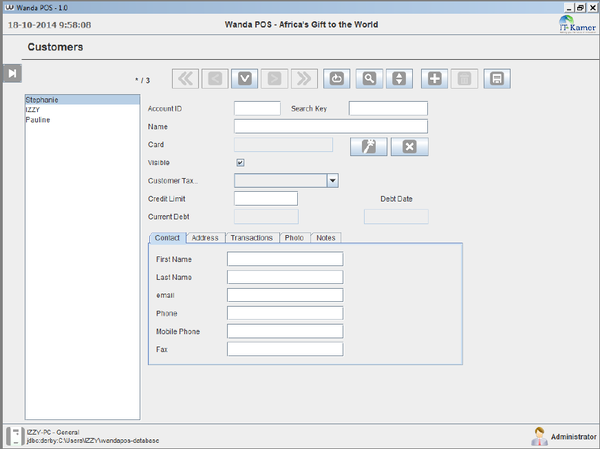
Viewing customer information
To view customer information proceed as follows
- Click on
 in the Register panel
 - Click on the Customers button
 on the display that shows up
 - Click on
 to list all customers OR
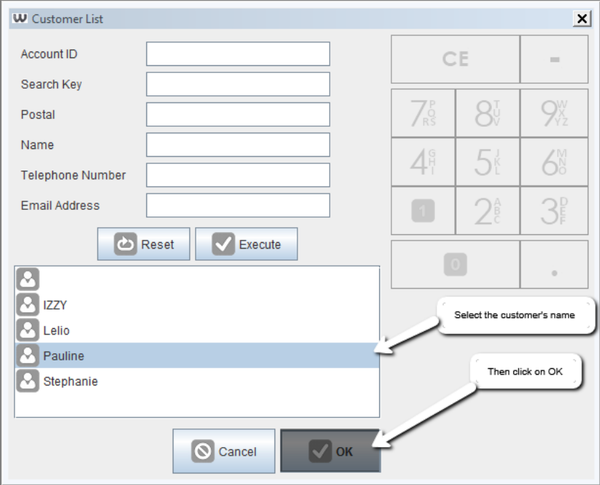
 - On the pop up window use the text fields labeled Tax ID, Search key or Name, or a combination of them to filter out the particular customer you’re looking for, then click on

- From the list select the customer’s name and click on
 .
.
Example: Viewing customer information
Let’s display information about the customer named Izzy, whose search key is i.
- Click on customers
 in the Register panel
 - Click on the Customers button
 on the display that shows up
 - Click on
 to list all customers, select Izzy from the list and click on
  . OR
. OR - On the pop up window type i in the text field labeled Search key and click on
 , then select Izzy from the list and click on
  (located at the bottom left corner of your window), then click on
  .
.
Example: Closing Cash
Let’s say we want to close the cash from August 20th, 2014 to October 20th, 2014. Follow the guidelines below to do this
- Click on
 located on the Main panel to the left of the display. (Check below for details on how to use the clock)
 - Click on
 (located at the bottom right corner of your window), then click on
  .
.
Viewing Closed Cash
Usually we use the clock to set specific time frames over which we want to perform an action or get a report. To do this we’ll use the example of a cash-by-user sales report. Let’s say we want to get a report of all the cash that came in starting from the 3rd of April 2000, at 09:47 AM to this present moment.
- Click on
 in the Administration panel to the left your window.
 - Under the Reports section click on

- Click on the clock button
 near the text field labeled Start date.
 - Click on the number
 on the calendar on the left side of the pop up window.
 - Use the Previous Month
 and Next Month
  buttons to select the appropriate month.
- If we’re in a month before April (i.e. January, February or March) click on the Next Month button
 till you get to April.
 - If we’re in a month after April (i.e. May, June, July, August, September, October,November or December) click on the Previous Month button
 till you get to April
 - If we’re in April, then we’re good. Just skip this step.
- If we’re in a month before April (i.e. January, February or March) click on the Next Month button
- Use the Previous Year button
 and Next Year button
  buttons to select the appropriate year.
- Use the buttons to the right of the clock on the right side of this pop up window to locate thetime. Next Hour
 adds an hour, Next Quarter
  adds a quarter of an hour (15 minutes] and Next Minute
  adds a minute, while Previous Minute
  reduces a minute, Previous Quarter
  reduces a quarter of an hour (15 minutes) and Previous
  Hour reduces an hour from the current time on the clock. For this demo I will assume that the time displayed on the clock is 12:00 AM (In the design of Wanda POS, for consistency reasons and to avoid unnecessary arguments, it is assumed that 12:00 AM is at mid-night) and we want to set the start time to 09:47 AM.
 - To get there from mid-night we have to go up. Click on Next Hour
 till the clock shows 9:00 AM.
 - Click on Next Quarter
 till the clock shows 9:45 AM.
 - Then click on Next Minute
 till the clock shows 9:47 AM.
 - That’s our start time. Click on
 to set this as the start time.
 - Click on the clock button
 near the text field labeled End date.
 - Click on
 to select the current time (If you are using Wanda POS uses offline it uses the timestamp from your computer as the current time. On a network (online) Wanda POS uses the time from the server.) as the end date, then click on
- Click on
 to display the report over the set period of time.
Example: Viewing Closed Cash
Let’s say we want a report on all cash closed from 20th April 2012 at 9:00 AM to 30 th September 24, 2014 at 10:00 PM.
- Click on
 in the Administration panel to the left your window.
 - Under the Reports section click on
 .
. - Use the clock to set the start date to 20th April 2012 and start time to 9:00 AM.
- Use the clock to set the end date to 30 th September 24, 2014 and end time to 10:00 PM.
- Click on
 to display all cash closed within the specified time frame.
Adding New Customers
There are two ways to go about it: from the Sales window OR from the Administration panel.
- Click on
 in the Register panel, and then click on the New Customer button
  button at the top left corner of your window. OR
 - Click on
 in the Administration panel on the left side of your window and then click on
  . Either one should lead you to the same display.
- The new window displayed contains a list of all customers currently on the system. Click on the New button
 to clear the screen and start creating a new customer.
 - Provide a Search key, Name and Max debt for the customer, then fill in the rest of the information.
- If your business allows the use of cards you can provide a card number for the customer by clicking on Create Key
 beside the text field labeled card. If you want to, you can remove the key by clicking on Clear Key
  .
. - If for some reason you don’t want this customer’s name to be visible in search fields you can toggle visibility by unchecking the check box labeled Visible
 .
.
Example: Adding New Customers
Let’s add a new customer with name Red1.
- The new window displayed contains a list of all customers currently on the system. Click on the New button
 to clear the screen and start creating a new customer.
 - Provide a Tax ID for the user e.g. Malaysia619.
- We want it to be possible for someone to search r and find this user. In the text field labeled Search key put in the letter r.
- In the text field labeled Name put in the name Red1.
- Click on the Edit button
 beside the text field labeled card.
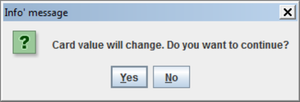
 - A confirmation dialog box pops up.
- Select
 to change the card value. If you want to remove the card value click on clear key
  beside and select
  .
. - Click on the drop down menu labeled Customer tax category and select the appropriate tax category from the drop down list.
- Let’s assume we can trust this customer and allow him to burrow items to a maximum of $10000. In the text field labeled Max debt and type in the amount 10000.
- For the First name type in Redhuan and for the Last name type in Oon.
- For the E-mail type in red1@red1.org.
- For the Phone type in (+237) 76 78 15 54.
- Click on the Location/Address tab and type in Malingo for Address line 1.
- Type in 237 for the Postal code, Buea for City, South West for the Region and Cameroon for the Country.
- Click on the Notes tab and write something to describe the user e.g. FOSS ERP Guru who is an open source advocate. Then click on the Save button
 to the save the changes.
Adding Stock
Adding Product Categories
To add a new category,
- Click on
 in the Administration panel of on the left side of your window.
 - In the Maintenance section click on
 . A list of all present categories is displayed.
 - Click on Add New
 to clear the screen for a new category.
 - In the text field labeled Name, provide a name for the category.
- If you want this to be a sub-category under another category click on the drop down menu labeled Category and select the category you want to place it under.
- If you have a representative image of the types of products in this category you can add it.
Example: Adding Product Categories
Let’s create a category for drinks
- Click on
 in the Administration panel of on the left side of your window.
 - In the Maintenance section click on
 . A list of all present categories is displayed.
 - Click on Add New
 to clear the screen for a new category.
 - In the text field labeled Name, type in the name Drinks.
- We can make this a sub-category under Refreshments. However, we’ll have to create the Refreshments category first.
- Let’s provide an image for this category. Click on the Images button
 . Use the pop up window to navigate the picture you want to use. Once you find the picture on disk, select the picture and click on
  . Use Zoom Out
  and Zoom In
  | (to reduce) to adjust the size of the picture to your satisfaction. In case you don’t want the picture anymore you can remove it by clicking on Remove Picture.
 - Click on
 to allow the category to be displayed on the catalog when queried OR
  to stop it from being displayed.
Customer Tax Categories
To add a new Tax customer category
- Click on
 in the Administration panel of on the left side of your window.
 - In the Point Of Sale section click on
 . A list of all present categories is displayed.
 - Click on Add New
 to clear the screen for a new category.
 - Give a name for the category.
- Click on the Save button
 to save.
Example: Customer Tax Categories
Let’s create a new customer tax category and call it Global Taxes.
- Click on
 in the Administration panel of on the left side of your window.
 - In the Point Of Sale section click on
 . A list of all present categories is displayed.
 - Click on Add New
 to clear the screen for a new category.
 - In the text field labeled Name, type in Global Taxes.
- Click on the Save button
 to save.
Tax Categories
- Click on
 in the Administration panel.
 - From the Point Of Sale section display select

- Click on the New button
 to clear the screen for a new entry.
 - Give a name for the category.
- Click on the Save button
 to save.
Example: Tax Categories
Let’s create a new customer tax category and call it Standard Taxes.
- Click on
 in the Administration panel.
 - From the Point Of Sale section display select

- Click on the New button
 to clear the screen for a new entry.
 - In the text field labeled Name, type in Standard Taxes.
- Click on the Save button
 to save.
Taxes
To add a new tax,
- Click on
 in the Administration panel.
 - From the Point Of Sale section of the display select
 .
. - Click on the New button
 to clear the screen for a new entry.
 - Provide a name for the tax.
- Use the drop down menu called Tax category to select a category for the tax.
- Use the drop down menu called Customer Tax category to specify a customer category for the tax.
- Enter the tax rate.
- Click on the Save button
 to save.
Example: Taxes
Let’s add a new tax and call it VAT which we intend to make a Standard tax and Global tax effective 4 hours from now.
- Click on
 in the Administration panel.
 - From the Point Of Sale section of the display select
 .
. - Click on the New button
 to clear the screen for a new entry.
 - In the text field labeled Name, type in the name VAT.
- Click on the drop down menu labeled Tax category. From the list of tax categories displayed select Standard taxes (which we created earlier).
- Click on the drop down menu labeled Customer tax category. From the list of customer tax categories displayed select Global taxes (which we created earlier).
- Enter the tax rate, 1.25
- Click on the Save button
 to save.
Adding a new category
To add a new category of products proceed as follows
- Click on
 in the Administration panel.
 - Click on
 . A list of all present categories of products is displayed.
 - Click on the New button
 to clear the screen for a new entry.
 - Provide a name for the category.
- If you have an image that depicts the variety of products in this category you can upload it as follows.
- Click on
 to allow this category to appear on the display OR to stop it from
  appearing.
 - Click on
 to register this new category.
Adding a new product
To add a new product proceed as shown below
- Click on
 in the Administration panel.
 - Click on
 . A list of all present products is displayed.
 - Click on the New button
 to clear the screen for a new entry.
 - Provide a name for the product.
- If you have an image that depicts the product you can upload it as follows.
Adding attributes to products
- Click on
 in the Administration panel.
 - Use the buttons
 ,
,  ,
,  and
and  to specify attributes for products.
 - There is no better way to illustrate this than the use of an example. Please follow the example below.
Example: Adding Sub-categories, products and attributes to products
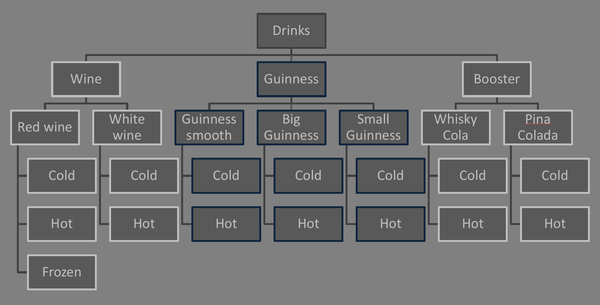
Let’s say our business also deals with the sale of drinks. We want to sell different kinds of drinks and each of these drinks have specific properties that differentiate them and we want our customers to have access to this information. E. g. consider the picture below
Hush up let’s make the necessary entries. First we’ll create a category called drinks, which will compris3 sub-categories; Wine, Guinness and Booster. We’ll create the attributes and finish by creating thproducts placing them in the categories and giving them the attributes.
- Click on
 in the Administration panel.
 - Click on the
 , then click on the New button
  to clear the screen for a new entry.
 - In the text field labeled Name type in the word Drinks.
- If you have an image of a drink you can upload it as follows.
- Click on
 to add it to the catalog, then click on
  to save.
 - Repeat the process to add 3 other categories; Wine, Guinness and Booster. To make them subcategories there’s just one extra thing you have to do.
- When creating each of them click on the drop down menu labeled Category and, from the drop down list, select the category called Drinks which we just created above.
- To add the attributes we’ll start by creating attribute sets. Click on
 in the Administration panel, then click on
  .
. - Click on the New button
 to clear the screen for a new entry.
 - In the text field labeled Name type in the word Red wine [this will be the name of the attribute we shall attach to Red wine], then click on the Save button
 to save.
 - Repeat the process to add attribute sets for white wine, Guinness smooth, big guinness, small guinness, whisky cola and pina colada.
- Now we’ll add product attributes to each of these. To add the attributes we’ll start by creating attribute sets. Click on
 in the Administration panel, then click on
  .
. - Click on the drop down menu labeled Product attribute and select red wine from the drop down list, then click on the New button
 to clear the screen for a new entry.
 - In the text field labeled Value type in the words Red wine (this will be one of the attributes Red wine), then click on the Save button
 to save.
 - Do the same for the Hot and Frozen tastes of red wine, then also do for all the Cold and Hot tastes of all the other drinks shown on the chart above.
- We’ll now give attribute values to these. That’s what will be displayed on the customers ticket when they make their order. To do this, click on
 in the Administration panel,then click on
  .
. - Click on the New button
 to clear the screen for a new entry.
 - In the text field labeled Name type in the word Red wine - Cold (this will be the name of the attribute we shall attach to Red wine), then click on the Save button
 to save.
 - Do the same for the hot and frozen tastes of red wine. Then, select a different product attribute (Guinness smooth, Small Guinness, Djino cocktail etc.) and add their own attribute values until you’ve gone through for all of them.
- Now let’s attach these attribute values to our products. To do this, click on
 in the Administration panel, then click on
  .
. - Click on the New button
 to clear the screen for a new entry.
 - In the text field labeled Order type in a number e.g. 1, click on the drop down menu labeled Product attribute and select an attribute. Then click on the Save button
 to save.
 - Click on the New button
 to clear the screen for another new entry. Enter a different number for Order and select a different Product attribute.
 - Repeat the process till you have exhausted all product attributes. Then select a different attributes set and do the same for all its attributes, till all product attributes of all product sets are exhausted.
- Let’s add products. Click on
 in the Administration panel, then click on
  .
. - Click on the New button
 to clear the screen for a new entry.
 - Enter the words Red Wine in the text field labeled Name. Also, enter the number 1 in the text field labeled Reference, same for the text field labeled Barcode (The Barcode and the Reference must be numbers. They must each be unique, but must necessarily be the same. i.e. if a product has barcode 1 no other product can have barcode 1, but any product can have reference 1. If a product has reference 1 no other product can have reference 1).
- Enter the buy price [price at which you buy a product] and sell price (price at which you sell).
- Click on the drop down menu labeled Tax category and select a tax category from the drop down list. If you don’t intend to place any taxes on this, select Tax Exempt.
- For the category select Wine (Red wine is a drink, but it’s also a wine and all wines are drinks. That’s why we’re not putting it under drinks.)
- For the attributes select Red Wine.
- If you have a photo for red wine you can upload it. To do that, follow the steps shown earlier. Once you’re done click on the Save button
 to save. Follow the same steps to add all the products shown on the chart above.
Inventory
Managing Stock Diary
Every now and then you’ll have to get new stuff from your suppliers. You’ll have to record these transactions such as purchases, refunds, movements, sales & breakage on the system.
- (In) Purchase: Use this when you make a purchase.
- (In) Refund: Use this if you sell products (in bulk) and the client wants to return them.
- (In) Movement: Use this in case you receive products from another branch of your company.
- (Out) Sale: Use this to make a bulk sale.
- (Out) Refund: Use this in case you make a bulk purchase and decide to return the products to your supplier.
- (Out) Breakage: Use this when products in your stock get bad (and cannot be sold).
- (Out) Movement: Use this when you are moving stock from your branch to another branch of the business.
Example, Managing Stock Diary – (In) Purchase
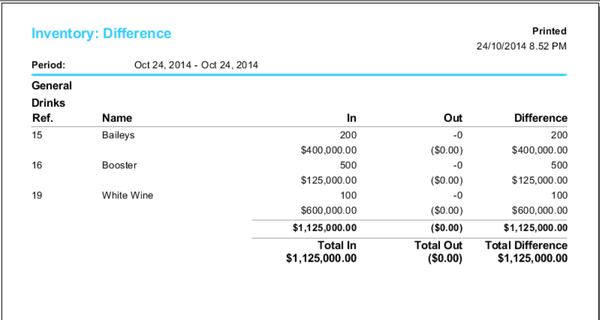
Let’s assume we’ve just made a purchase and received 500 boosters, 100 bottles of white wine and 200 bottles of baileys. Let’s record this transaction.
- Click on
 in the Administration panel.
 - In the Maintenance section click on
 .
. - Click on the New button
 to clear the screen for new input.
 - To go through with this transaction you have to search for the product. You can do this by using the product id, barcode or product name. (NB: for this example we’ll be using the product name.)
- Click on the search button (Search Product List)
 to the right of the greyed-out text field labeled Product.
 - On the product list window that pops up click on the drop-down menu labeled Category and select Drinks from the drop-down list.
- Click on
 to display the list of all products within this category (Drinks).
 - Select Booster from the list and click on
 .
. - Click on the text field labeled Units and enter the number 500.
- Click on the drop-down menu labeled Reason, then select (In) Purchase from the drop-down list.
- Click on the drop-down menu labeled Location and select your stock location from the drop-down list.
- If the product has different flavours (different types of the same product which are registered on the system) click on the Product Attributes button
 and select the particular flavor you just added to your stock.
 - Click on the Save button
 to this transaction.
 - Repeat the same process to enter to enter 100 bottles of white wine and 200 bottles of Baileys.
- Run an Inventory: Difference report to confirm that the products were actually recorded in the system.
Reporting
Customer Reports
At times we may want to know who our customers are, where they live, how much they owe, how much they’re allowed to owe, payment deadlines etc. You can get this info for all customers or for a particular customer.
Reports for all customers
- Click on
 in the Administration panel on the left.
 - In the Reports section, click on
 .
. - Click on
 to generate the report for all customers.
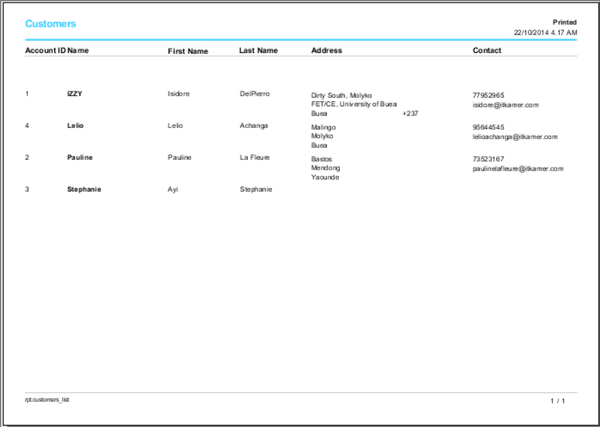
Example, Reports for all customers
- Click on
 in the Administration panel on the left.
 - In the Reports section, click on
 .
. - Click on
 to generate the report for all customers.
NB: Use the tools in the toolbar to customize the view or size of the display. You can also print of export to a specific document format.
Reports for a particular customer
- Click on
 in the Administration panel on the left.
 - In the Reports section, click on
 .
. - Click on the customer list button
 to the right of the text field labeled Customer.
 - Use the pop window to pick out the particular customer you’re searching for.
- Click on
 , select the customer’s name, then click on
  .
.
Example, Reports for a particular customer
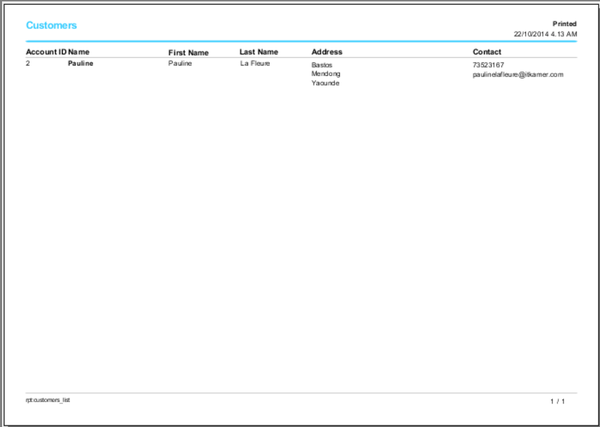
Let’s say we want reports on a customer named Pauline.
- Click on
 in the Administration panel on the left.
 - In the Reports section, click on
 .
. - Click on the customer list button
 to the right of the text field labeled Customer.
 - Enter the customer’s TaxID, Search key, Name or a combination of them. In our case I’ll just enter p for the search key.
- Click on
 . (This filters out all customers with a search key that starts with p).
 - Click on the customer’s name (in our case I’ve clicked on Pauline).
- Then click on
 to single out the customer.
- Then click on Execute report to display a report on this particular customer (Pauline).
NB: Use the tools in the toolbar to customize the view or size of the display. You can also print of export to a specific document format.
Customer Debtors
Every now and then customers will fail to meet their payment deadlines. It’s very easy to know who has and who hasn’t met their deadlines. You must not go through every customer report to know who hasn’t.
- Click on
 in the Administration panel on the left side of the window.
 - Under the reports section click on
 .
. - Click on
 . A list of all customers is displayed alongside their account ID, address and current debt.
Customers Dairy
At time we just want to look at the general picture. In-flow and out-flow of cash, payments, tickets etc. Customers diary is the place for this.
- Click on
 in the Administration panel.
 - Under the reports section click on
 .
. - Set the appropriate filters: customer, start date and/or end date.
Click on ![]() to display the report.
to display the report.
Example, Customers Dairy
Let’s say we want a report of all Pauline’s financial activities from September 7, 2013 at 12:47 AM to this present moment.
- Click on
 in the Administration panel.
 - Under the reports section click on
 .
. - Click on the Customer button to the right of the text field labeled Customer.
- On the pop up window enter the Tax ID, Search key and/or name of the customer you’re searching for. (in our case it’s Pauline, so I’ll just enter p for the search key).
- Click on
 . In case you made a mistake click on
  to filter all over.
 - This on the customer’s name , then click on
 .
. - Click on the calendar
 to the right of the text field named Start date.
 - Set the date to September 7, 2014 and the time to 12:47, then click on
 .
. - Click on the calendar
 to the right of the text field labeled End date.
 - Click on
 , then click on
  .
. - Click on
 to display the output.
Stock Reports
Products reports
At times you want to know exactly what products you have and in what amounts, or what products satisfy a certain constraint or set of constraints. This is how to go about it.
- Click on
 in the Administration panel on the left side of your window.
 - In the reports section of the new window click on
 .
. - Click on
 to list all products in stock OR
 - Use the form above the display to set the appropriate constraints and then click on

Example, Products reports
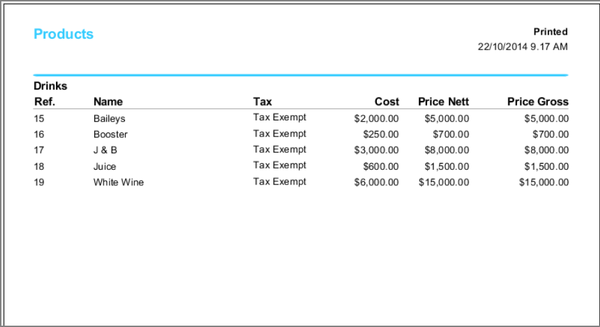
Let’s say we want a list of all drinks sold for $500 or greater. Proceed as follows.
- Click on
 in the Administration panel on the left side of your window.
 - In the reports section of the new window click on
 .
. - Click on the drop down menu labeled Category and select Drinks from the drop down list.
- Click on the drop down menu labeled Sell Price and select Greater or equal from the drop down list. In the text field beneath it type in the amount 500.
- Use the form above the display to set the appropriate constraints and then click on
 .
.
Current Inventory
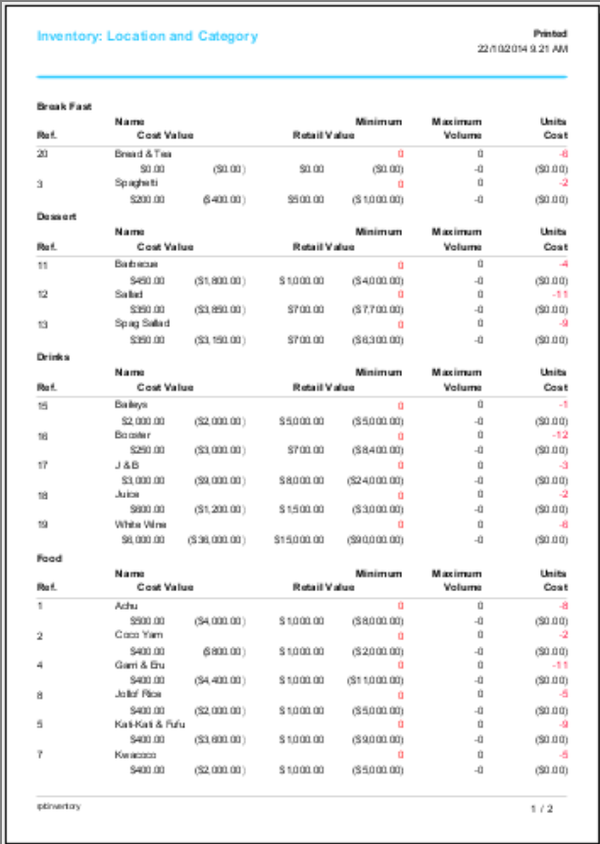
To get your current inventory proceed as shown below.
- Click on
 in the Administration panel on the left side of your window.
 - In the reports section of the new window click on

- Click on
 to list all products in stock OR
 - Use the form above the display to set the appropriate constraints and then click on
 .
.
Sales Reports
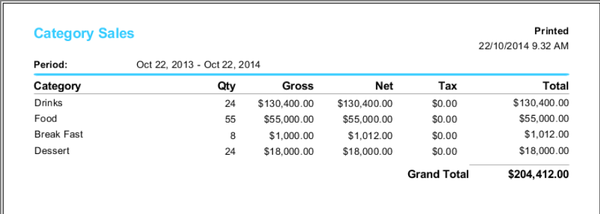
Category Sales
- Click on
 in the Administration panel on the left.
 - In the Reports section click on

- Use the calendar to set the Start Date and End Date for the report.
- Click on
 to display the report for the set time period.
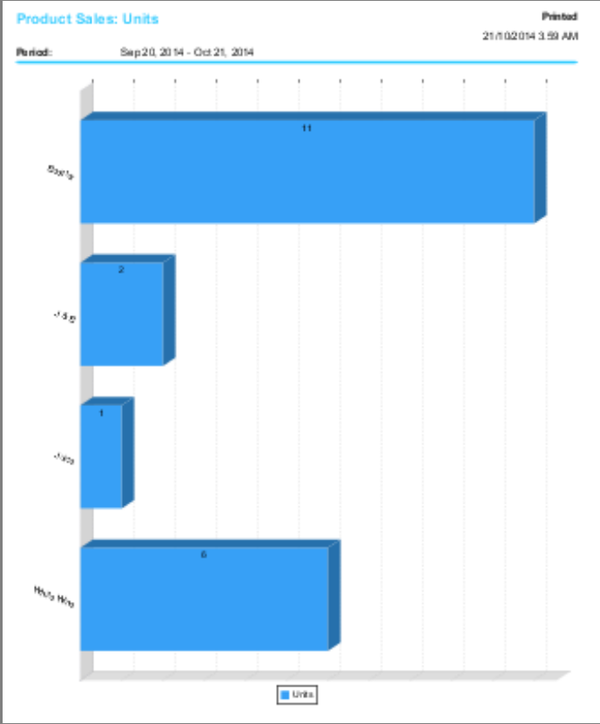
Product Sales
To get a product sales report,
- Click on
 in the Administration panel on the left.
 - In the Reports section click on

- Use the calendar to set the Start Date and End Date for the report.
- Click on
 to display the report for the set time period.
DRAWING CHARTS
Drawing Charts Sales
Product sales charts
This gives a graphical representation of how much of each product that satisfied a specified constraint (or set of constraints) was sold over a specified period of time.
- Click on
 in the Administration panel on the left part of your window.
 - In the Charts section of the window displayed click on
 .
. - Use the clock to set the boundaries of the period under consideration and the form below it to set the appropriate constraints.
- Once the boundaries and constraints are set click on
 .
.
Example, Product sales charts
Let’s say we want to know how much of each drink was sold for $500 or greater from 1:00 PM of Saturday, September 20, 2014 to this very moment.
- Click on
 in the Administration panel on the left part of your window.
 - In the Charts section of the window displayed click on
 .
. - Click on the calendar beside the text field labeled Start Date, and then use the clock to set the (Check above for details on how to use the clock) date to September 20, 2014 and time to 1:00 PM.
- Click on the calendar to the right of the text field labeled End Date, click on
 and then click on
  .
. - In the section just below the clock [the section labeled ‘By Form’]. Click on the drop down menu labeled Category and select Drinks from the drop down list. Select Distinct from the drop down list labeled Name.
- Select Greater or equal from the drop down list labeled Sell Price. Click on the text field below it and type in the amount 500.
- Click on
 to display the appropriate chart.
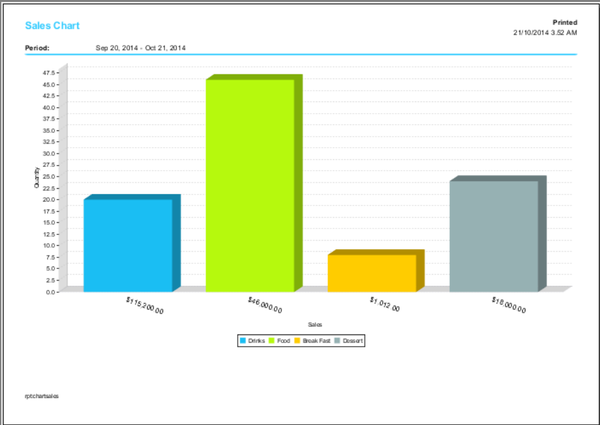
Sales charts
This gives a graphical representation of the sales made for each category of products over a specified period of time.
- Click on
 in the Administration panel on the left part of your window.
 - In the Charts section of the window displayed click on
 .
. - Use the clock to set the boundaries of the period under consideration and the form below it to set the appropriate constraints.
- Once the boundaries are set click on
 .
.
Example, Sales charts
Let’s say we want a graphical representation of sales made for each category of products from 1:00 PM of Saturday, September 20, 2014 to this very moment.
- Click on
 in the Administration panel on the left part of your window.
 - In the Charts section of the window displayed click on
 .
. - Click on the calendar beside the text field labeled Start Date, and then use the clock to set the date to September 20, 2014 and time to 1:00 PM (Check above for details on how to use the clock.)
- Click on the calendar to the right of the text field labeled End Date, click on
 and then click on
  .
.
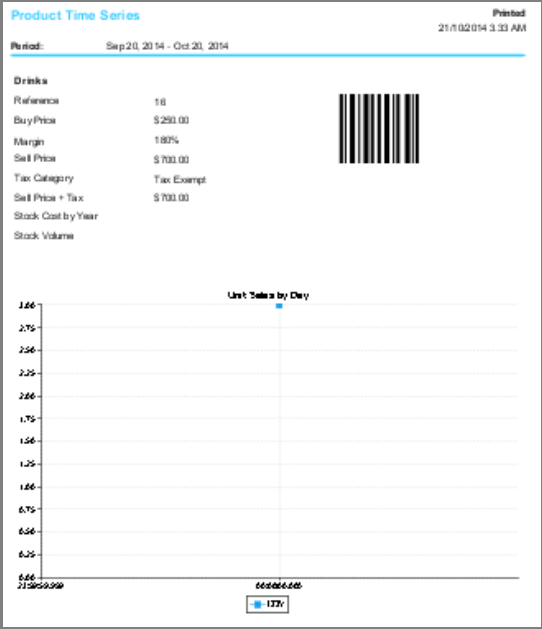
Product time series charts
This gives information about the sales of products which satisfy a specified constraint over a specified period of time.
- Click on
 in the Administration panel on the left part of your window.
 - In the Charts section of the window displayed click on
 .
. - Use the clock to set the boundaries of the period under consideration and the form below it to set the appropriate constraints.
- Once the boundaries are set click on
 .
.
Example, Product time series charts
Let’s say we want information about drinks that were sold for $500 or greater from 1:00 PM of Saturday, September 20, 2014 to this very moment.
- Click on
 in the Administration panel on the left part of your window.
 - In the Charts section of the window displayed click on
 .
. - Click on the calendar beside the text field labeled Start Date, and then use the clock to set the date to September 20, 2014 and time to 1:00 PM. (Check above for details on how to use the clock.)
- Click on the calendar to the right of the text field labeled End Date, click on
 and then click on
  .
. - In the section just below the clock [the section labeled ‘By Form’]. Click on the drop down menu labeled Category and select Drinks from the drop down list. Select Distinct from the drop down list labeled Name.
- Select Greater or equal from the drop down list labeled Sell Price. Click on the text field below it and type in the amount 500.
- Click on
 to display the appropriate chart.
Top 10 sales charts
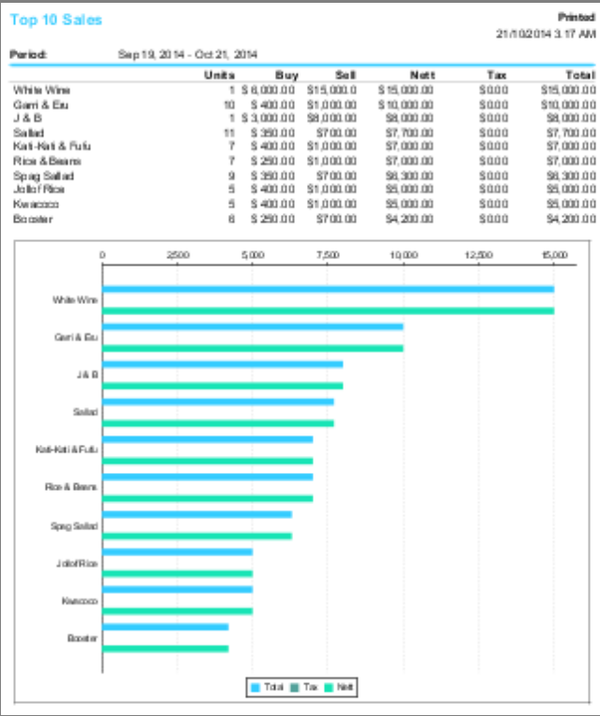
This gives a graphical display of the top 10 most sold products. On the display a distinction is made total sales (taxes included), taxes and net sales (without taxes). To get this display proceed as follows.
- Click on
 in the Administration panel on the left part of your window.
 - In the Charts section of the window displayed click on
 .
. - Use the clock to set the boundaries of the period under consideration.
- Once the boundaries are set click on
 .
.
Example, Top 10 sales charts
Let’s say we want to see the top 10 products sold from 1:00 PM of Saturday, September 20, 2014 to this very moment.
- Click on
 in the Administration panel on the left part of your window.
 - In the Charts section of the window displayed click on
 .
. - Click on the calendar beside the text field labeled Start Date, and then use the clock to set the date to September 20, 2014 and time to 1:00 PM.
- Click on the calendar to the right of the text field labeled End Date, click on
 and then click on
POS INTEGRATION
Wanda POS integration with iDempiere is very useful for businesses with different parts that have to put up with asynchronous communication for data retrieval and synchronization. This asynchronous communication is made possible by the use of a middle server, the ActiveMQ service. As such, this section of the Administrator’s Guide is written with the assumption that you have iDempiere installed and have the ActiveMQ service running properly. Screen shots are taken from the demo done on a windows machine, but if you’re using a different operating system you’ll be just fine.
NB: For more information on using iDempiere (best ERP system in the world), visit ...
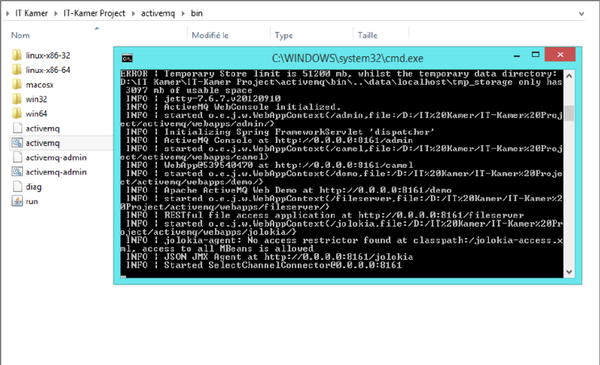
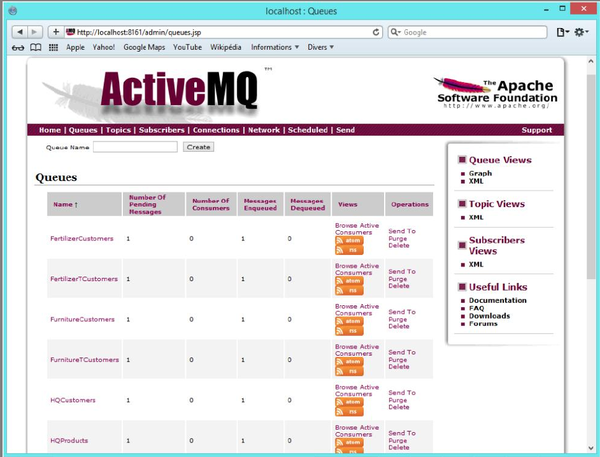
First we have to start up the ActiveMQ middle server.
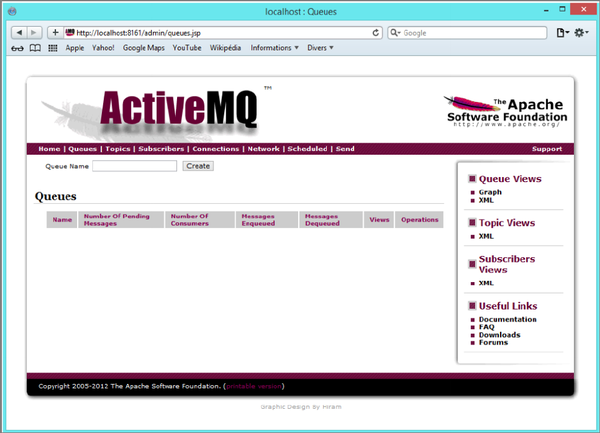
When you first start, as you see, there are no messages sent to ActiveMQ.
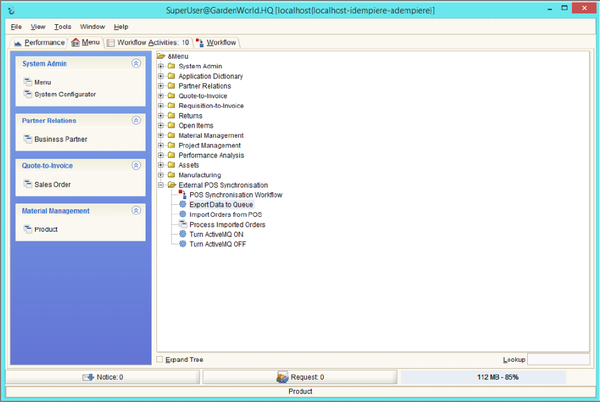
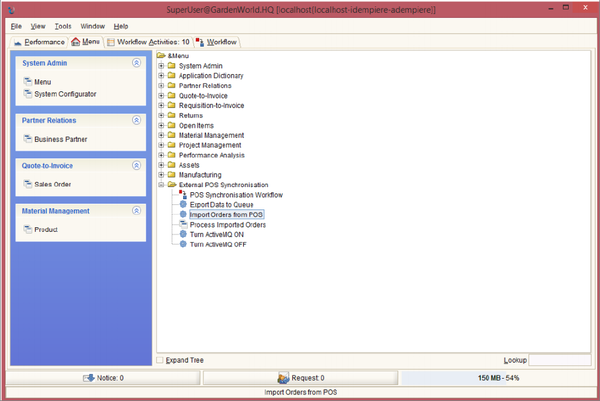
Now we switch to iDempiere where we have the POS Integration plugin installed already. Open up the menu tree “External POS Integration.” It contains all the processes and windows necessary for synchronization with Wanda POS.
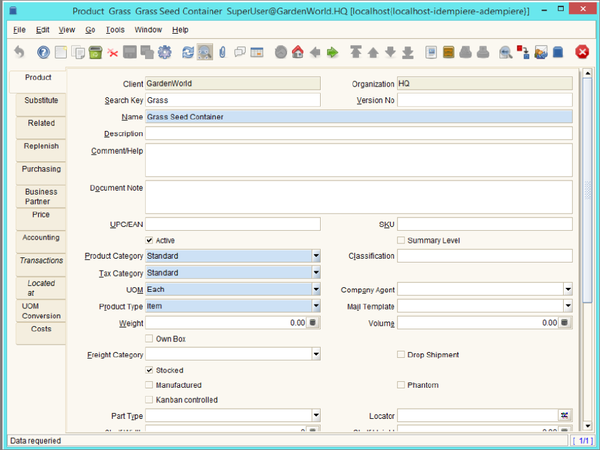
For the purpose of this demo we’ve added a new product on iDempiere ERP, with product info shown below.
- Name: “Grass Seed Container”
- Product Category: “Standard”
- Tax Category: “Standard”
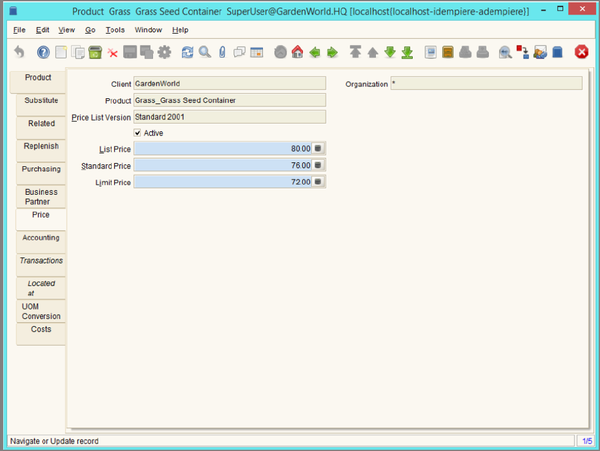
- For this product we’ve also added a price list with info shown below
- List price: “80.00”
- Standard price: “75.00”
- Limit price: “72.00”
Let’s assume we have 12 units of this product in stock at HQ. So we’ll set ‘quantity in hand’ for this product to 12.
NB: The 12 units of this product we have are in the HQ stock. So when we synchronize with Wanda POS, we’ll only be able to do so with the Wanda POS station for which POS Locator Name is “HQ.”
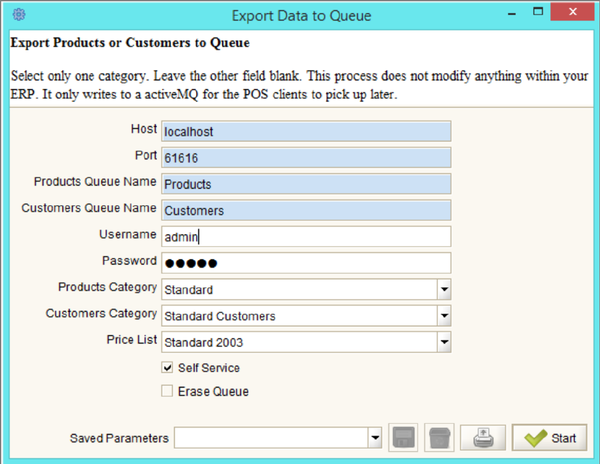
On the ‘External POS Synchronization’ tree, click on the process named “Export Data To Queue.” The window shown below pops up.
We’ll use this to provide the necessary information that will enable us synchronize with the particular Wanda POS station we’re targeting (in our case, “HQ”).
- Host: localhost
- The host to which ActiveMQ is currently listening. We’re doing this demo on our local machine, so we’ve set the host to “localhost.” Your case may be different if you’re not testing on a local machine. (The value must be the same as the value in the file wandapos.properties.)
- Port: 61616
- The port to which the ActiveMQ server listens.
- Products Queue Name: Products
- This is the queue name in ActiveMQ to which the process will send the products during synchronization.
- Customers Queue Name: Products
- This is the queue name in ActiveMQ to which the process will send customers during synchronization.
- Username: admin
- This is the username for the ActiveMQ server.
- Password: *******
- This is the password for the ActiveMQ server.
- Product Category: Standard
- This is the product category for the product we want to synchronize.
- Customer Category: “Standard Customers”
- This is the customer category for the product we want to synchronize.
- Price List: “Standard 2003”
- This is the price list for the product we want to synchronize.
NB: This process exports products per POS Locator Name (Organisation / Station). i.e. if you are exporting 20 products for 5 different Wanda POS stations, they will be exported in 5 different queues (each indicating the number of products exported for that particular station) in ActiveMQ.
When all information is correctly entered, click on start. After synchronization you’ll see a confirmation window similar to the one shown below.
Once you see the window shown above, switch to the ActiveMQ server. You’ll see a new message sent. All products in all stations are sent to ActiveMQ, but only the Wanda POS station you targeted (i.e. pos = HQ) can synchronize products and customers in the queues targetted. In our case, it’s “HQ.”
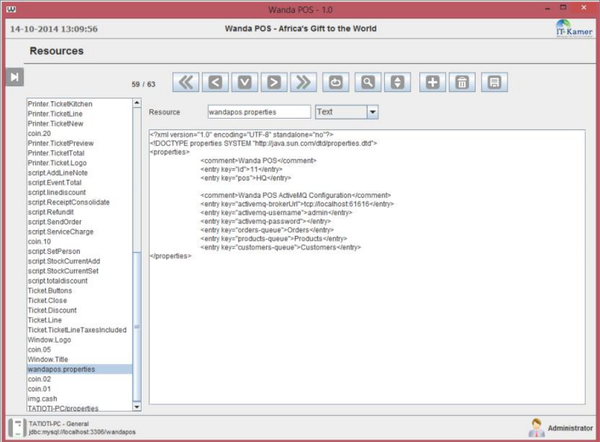
Note: The key used to identify each Wanda POS station is “POS Name Locator” (pos key in wandapos.properties file)
As such, when you synchronize, you have to be sure of the following
- Customers and Products Queue Names must be the same in both Wanda POS and iDempiere.
- POS Name (<entry key="pos">HQ</entry> in wandapos.properties) must match one organization in iDempiere ERP.
Now it’s time to lunch Wanda POS. When you lunch Wanda POS for the first time, as you can see below, there is only one category: “Category Standard” which has one product.
Click on Maintenance in the Administration panel on the left side of the window, then click on ![]() . Scroll down and select the resource named wandapos.properties. You have to modify this file according to the ActiveMQ server configuration, queue name (Products and Customers) you set when exporting the data from iDempiere.
. Scroll down and select the resource named wandapos.properties. You have to modify this file according to the ActiveMQ server configuration, queue name (Products and Customers) you set when exporting the data from iDempiere.
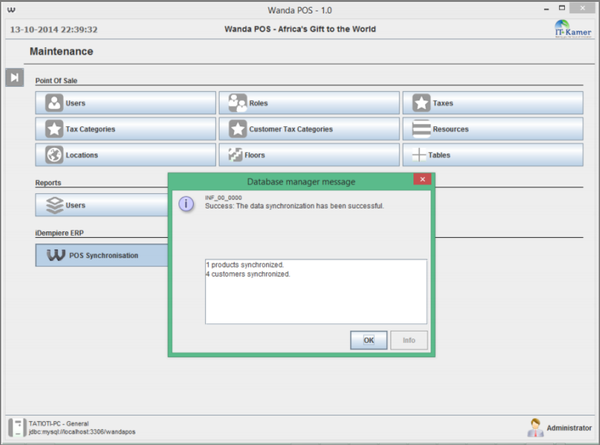
Go back to the Maintenance menu [in the Administration panel on the left side of the window] and click
on ![]() . The database manager responds after a few seconds and we have a pop up window displaying information about the imported data.
. The database manager responds after a few seconds and we have a pop up window displaying information about the imported data.
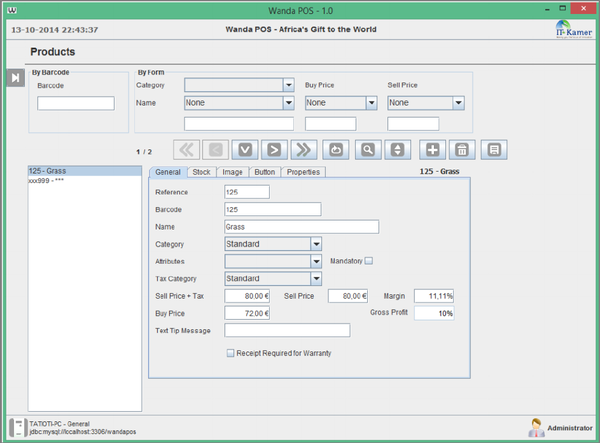
Go back to the Maintenance menu and click on Products. )Remember that initially we had just one category: “Category Standard”, with one product). After synchronization we see extra categories and products which have been imported as a result of the synchronization.
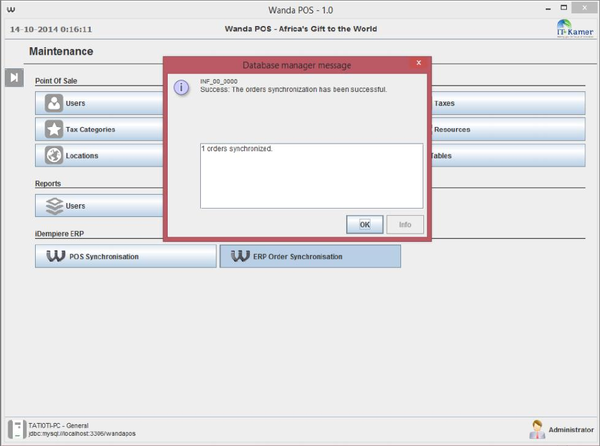
Click on the Sales button on the Main panel. Make an order or a couple of orders (we’ll use this as a demo for synchronizing orders back to iDempiere) as shown in the User’s Guide. Once you’re done making the order(s) click once again on the Maintenance button in the Administration panel on the left side of your window. Then click on ![]() similar to the one below. A few seconds later you’ll get a confirmation.
similar to the one below. A few seconds later you’ll get a confirmation.
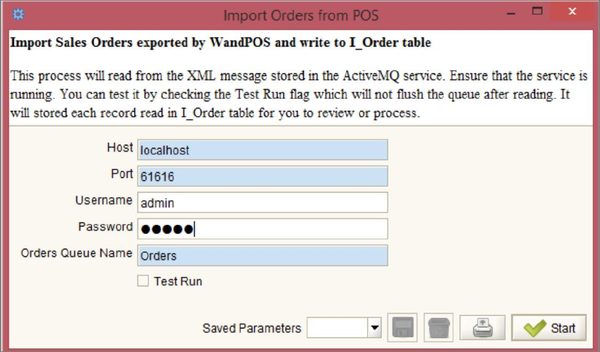
Back in iDempiere ERP, click on the process “Import Orders from POS”. You’ll see a screen like the one below.
Fill in the appropriate information and click on Start.
After a few seconds you should get a confirmation similar to the one in the screen shot below.
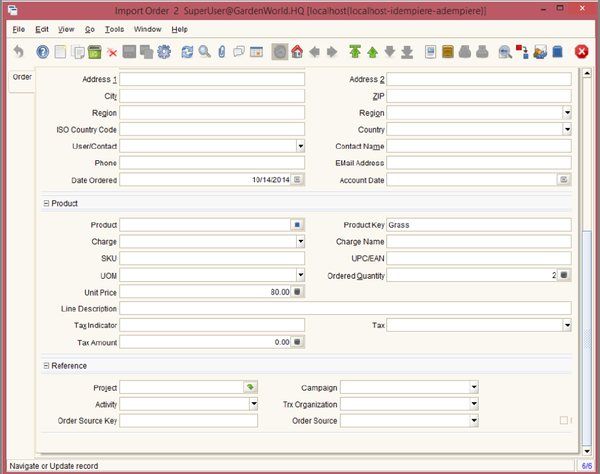
In the External POS Synchronization tree click on the process named “Process Imported Orders.” You’ll see a pop up similar to that shown below. Click on the drop down arrow in the toolbar. Notice that there orders information has changed as a result of the import from Wanda POS.
Special thanks to Redhuan D. Oon for his original idea about integrating aDempiere with OpenBravo POS.


