Developing Plug-Ins - IUserPanelMenuFactory
This How-To is brought to you by Jan Thielemann from evenos GmbH (www.evenos-consulting.de). If you have questions, criticism or improvement suggestions, feel free to visit me (Jan.thielemann) or write me an email
Goal of this How-To
The goal of this How-To is to show you how you can use the IUserPanelMenuFactory service in you plug-in project. The reason why you might want to use this service is to provide additional menu entries in the WebUI (besides Feedback, Preference, Change Role and Log Out).
Prerequisites
Before you start this How-To, you should take a look at the following How-Tos:
Also if not already integreated into the trunk, you need to install the provided patches from https://idempiere.atlassian.net/browse/IDEMPIERE-2000
The workflow
The first thing you want to do is to create a Plug-In. If you already have a Plug-In and just want to add the MenuFactory there, thats also ok. To create a new Plug-In you select the Eclipse-Menu File>New>Other... Here you go to the "Plug-in Development" section and chose Plug-in Project. Chose a name and a location, make sure the OSGi framework is Equinox and click on next. Chose your name and the execution environment and click on finish.
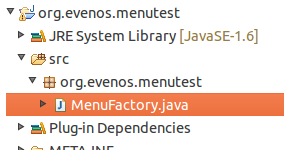
The second step is to create a class which implements the IUserPanelMenuFactory interface. To do this, create a package of your choice and create a new class in there:
package org.evenos.menutest;

import org.adempiere.webui.factory.IUserPanelMenu;
import org.adempiere.webui.factory.IUserPanelMenuFactory;

public class MenuFactory implements IUserPanelMenuFactory {

	@Override
	public IUserPanelMenu getImplementation() {
		return null;
	}

}
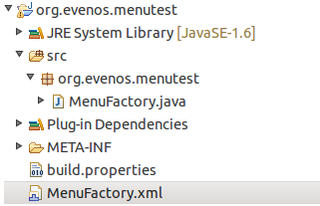
The third step is to create a new component definition so that the core can know that your Plug-In provides a factory. To do this, select File>New>Other... from the Eclipse menu and chose Component Definition from the Plug-in Development section. Give it a unique name in your Plug-In and click on finish.
In the component definition, provide a unique name (unique in the whole application). The best is to use the reverse domain identifier or the plugin name followed by menufactory (e. g. org.evenos.menutest.menufactory). Then chose your class which implements the IUserPanelMenuFactory and add a new property called "service.ranking" which is a integer and has a value > 0. Then go to the Services tab and select the org.adempiere.webui.panel.IUserPanelMenuFactory service in the provided services section. The component definition should now look like this:
<?xml version="1.0" encoding="UTF-8"?>
<scr:component xmlns:scr="http://www.osgi.org/xmlns/scr/v1.1.0" name="org.evenos.menutest.menufactory">
   <implementation class="org.evenos.menutest.MenuFactory"/>
   <service>
      <provide interface="org.adempiere.webui.factory.IUserPanelMenuFactory"/>
   </service>
   <property name="service.ranking" type="Integer" value="100"/>
</scr:component>
After the component definition is ready, we can start implementing the new menus. To do this, you will need another new class. Create it in a package of your choice and implement the IUserPanelMenu interface
package org.evenos.menutest;

import org.adempiere.webui.factory.IUserPanelMenu;
import org.adempiere.webui.panel.UserPanelMenu;
import org.zkoss.zk.ui.Component;
import org.zkoss.zk.ui.event.Event;

public class MenuImplementation implements IUserPanelMenu {

	@Override
	public void onEvent(Event event) throws Exception {
		// TODO Auto-generated method stub
	}

	@Override
	public UserPanelMenu[] getMenus() {
		// TODO Auto-generated method stub
		return null;
	}

	@Override
	public void setComponent(Component component) {
		// TODO Auto-generated method stub
	}

}
Now this is the class where the real action happens. But before we can implement our new menus, we have to do a last thing. We need to return a new instance of this class in our factory:
public class MenuFactory implements IUserPanelMenuFactory {
	@Override
	public IUserPanelMenu getImplementation() {
		return new MenuImplementation();
	}
}
The next thing you might want to do is to create variables for the menu ids. I do this by using private final static Strings. In the getMenus() method, i create a bunch of UserPanelMenu objects and return them. You can either use the static getter from UserPanelMenu or just create them by yourself using the default constructor and the setters. Remember that this code belongs in the class which impelments the IUserPanelMenu interface:
	private final static String MENU_ONE_ID = "org.evenos.menu.one";
	private final static String MENU_TWO_ID = "org.evenos.menu.two";
	private final static String MENU_THREE_ID = "org.evenos.menu.three";

		@Override
	public UserPanelMenu[] getMenus() {
		UserPanelMenu menu1 = UserPanelMenu.get(
				MENU_ONE_ID,
				Msg.getMsg(Env.getCtx(), MENU_ONE_ID),
				"desktop-header-font link",
				ThemeManager.getThemeResource("images/BPartner10.png"),
				"Tooltip 1");
		UserPanelMenu menu2 = UserPanelMenu.getWithoutImage(
				MENU_TWO_ID,
				Msg.getMsg(Env.getCtx(), MENU_TWO_ID),
				"desktop-header-font link",
				"Tooltip 2");
		UserPanelMenu menu3 = UserPanelMenu.getWithoutName(
				MENU_THREE_ID,
				"desktop-header-font link",
				ThemeManager.getThemeResource("images/BPartner10.png"),
				"Tooltip 3");
		return new UserPanelMenu[] { menu1, menu2, menu3 };
	}
In the setComponent() method, i store the component for later use, you will see why after the next step.
	private Component component;

	@Override
	public void setComponent(Component component) {
		this.component = component;
	}
I also want to implement a popup menu like the Feedback button has one so i use the constructor of my factory to create the menu and store it in a variable. As you can see, i also use final static Strings for the ids here which i also use to get a translated name for the Menuitems.
	private Menupopup myMenu;

	private final static String MENU_ITEM_ONE_ID = "org.evenos.menuitem.one";
	private final static String MENU_ITEM_TWO_ID = "org.evenos.menuitem.two";

	public MenuImplementation() {
		myMenu = new Menupopup();
		Menuitem mi = new Menuitem(Msg.getMsg(Env.getCtx(),MENU_ITEM_ONE_ID));
		mi.setId(MENU_ITEM_ONE_ID);
		myMenu.appendChild(mi);
		mi.addEventListener(Events.ON_CLICK, this);
		mi = new Menuitem(Msg.getMsg(Env.getCtx(), MENU_ITEM_TWO_ID));
		mi.setId(MENU_ITEM_TWO_ID);
		mi.addEventListener(Events.ON_CLICK, this);
		myMenu.appendChild(mi);
	}
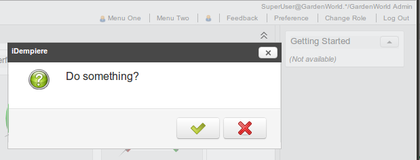
The last step is to implement the onEvent() method to handle all the events. On the first menu button, i want to show the popup menu, on the second, i want to show a dialog box. On the third button and the popupmenu buttons, i simply want to log something to the console. Heres the implementation and now you know why i stored the component in the setComponent() method earlier:
	@Override
	public void onEvent(Event event) throws Exception {
		if (event.getTarget().getId().equals(MENU_ONE_ID)) {
			if (myMenu.getPage() == null) {
				component.appendChild(myMenu);
			}
			myMenu.open(event.getTarget(), "after_start");
		} else if (event.getTarget().getId().equals(MENU_TWO_ID)) {
			FDialog.ask(0, component, "Do something?", new Callback<Boolean>() {
				@Override
				public void onCallback(Boolean result) {
				}
			});
		} else if(event.getTarget().getId().equals(MENU_THREE_ID)){
			System.out.println("Menu three pressed");
		}else if (event.getTarget() instanceof Menuitem) {
			Menuitem mi = (Menuitem) event.getTarget();
			if (MENU_ITEM_ONE_ID.equals(mi.getId())) {
				System.out.println("Menuitem one pressed");
			} else if (MENU_ITEM_TWO_ID.equals(mi.getId())) {
				System.out.println("Menuitem two pressed");
			}
		}
	}
Notice how i use the ID of the target of the event to determine which menu/-item was pressed. The last thing you need to do now is to create new messages. To do this, log in as SystemAdmin and open the message window.:
Finally, after we reset the cache (Process: Cache Reset) and changed the role or log out and back in, we can see our new menus in all their beauty.
Troubleshooting
- Make sure the Plug-In is loaded and started correctly
- If you use a custom theme, make sure that the theme/<themename>/zul/desktop/header.zul is loaded and uses the UserPanel class. If you have a custom implementation of the UserPanel, make sure that you load additional menus in the addAdditionalMenus()-method


