Developing Plug-Ins - Get your Plug-In running
⚠️ Deprecated Page
This page is retained for historical reference only. The documentation has been updated and migrated to Docusaurus: https://docs.idempiere.org/docs/basic-development/plugin-development/developing-plugins
This tutorial is brought to you by Jan Thielemann from evenos GmbH (www.evenos-consulting.de). If you have questions, criticism or improvement suggestions, feel free to visit me (Jan.thielemann) or write me an email
Goal of this How-to
The goal of this how-to is to show you, how you get your new plug-in started. After creating your plug-in project you might ask yourself: how do i get this plug-in running? Either you want to create a ModelValidator, a Callout, a Process or a Report, you often need to set the fully qualified class name in iDempiere so it can load your custom class. If you develop customizations you should place your custom classes in a new plug-in so you also can get the newest changes from the trunk without struggling with merging conflicts. I will show you a way you can do this.
Prerequisites
Before you start developing ModelValidators or whatever, you should take a look at Developing Plug-Ins without affecting trunk and Developing Plug-Ins - Create a Feature Project to follow our best practice when developing a new plug-in.
The workflow
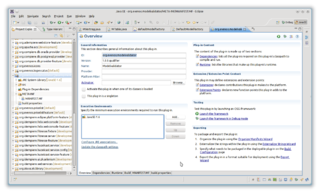
After creating your plug-in, start by opening you MANIFEST.MF. It should similar to this:
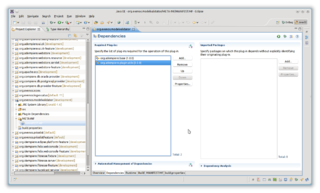
The first thing you should do is to add all necessary dependencies. To do this, switch to the Dependencies tab of your manifest and add them. In our case, add the org.adempiere.base project and the org.adempiere.plugin.utils project:
Switch back to the Overview tab. Check the "This plug-in is a singleton" checkbox and save. Select the AdempiereActivator as the activator class. We often use the AdempiereActivator because if you have a 2Pack.zip in your META-INF folder, the Activator does the pack in automatically:
Basically that's all you need to do in the manifest. Now go to the run configurations, select the swing client or the server and go to the Plug-ins tab. Here you search your plug-in and make it active:
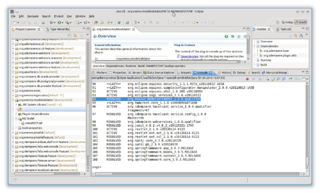
Now you can run the server.product launcher. Before you login into the client, click in the console window, type in "ss" and hit return:
You will get a list of all available plug-ins. Find your plug-in in the list and remember the number:
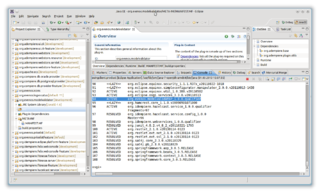
Now type in "start 94" or whatever your number is, to start your plug-in. After you see the osgi prompt again, your plug-in started. You can check again by typing in "ss" again and see if your plug-in is now active:
That's it, your plug-in is now available. Take a look at our other plug-in development how-to to see which additional steps are necessary if you want to use ModelValidators, Processes, Callouts or other classes from your plug-in. If you want to start your plug-in automatically take a look the the run configurations and set its Autostart to true. You can also check the "Activate this plug-in when one of its classes is loaded" checkbox in the MANIFEST.MF.
Distribution of plugins
Server / WebUI
Before you can install your plug-in, you have to export it from your workspace. To do so, take a look at Developing Plug-Ins - Create a Feature Project.
Install via p2 repository
This is the recommended way when you have a p2 repository.
You can also install an exported feature directly from its p2 repository. To do so, go to your server idempiere home directory and use the following command to install a feature, for example to install the idempiere-rest plugin you can execute:
1cd /opt/idempiere-server
2bash update-prd.sh https://jenkins.idempiere.org/job/idempiere-rest/ws/com.trekglobal.idempiere.extensions.p2/target/repository/ com.trekglobal.idempiere.rest.api
Note that the script update-prd.sh internally executes two commands, one to uninstall the plugin in case it already exists, and another to install it again, you can alternatively execute those two instructions like this:
To install a feature:
1java '-Dorg.eclipse.ecf.provider.filetransfer.excludeContributors=org.eclipse.ecf.provider.filetransfer.httpclient4 -Djava.net.preferIPv4Stack=true' -jar plugins/org.eclipse.equinox.launcher_1.6.500.v20230717-2134.jar -install director -profile DefaultProfile -configuration director/configuration -application org.eclipse.equinox.p2.director -consoleLog -profileProperties org.eclipse.update.install.features=true -destination /opt/idempiere-server -repository https://jenkins.idempiere.org/job/idempiere-rest/ws/com.trekglobal.idempiere.extensions.p2/target/repository/ -u com.trekglobal.idempiere.rest.api
To uninstall a feature, use:
1java '-Dorg.eclipse.ecf.provider.filetransfer.excludeContributors=org.eclipse.ecf.provider.filetransfer.httpclient4 -Djava.net.preferIPv4Stack=true' -jar plugins/org.eclipse.equinox.launcher_1.6.500.v20230717-2134.jar -install director -profile DefaultProfile -configuration director/configuration -application org.eclipse.equinox.p2.director -consoleLog -profileProperties org.eclipse.update.install.features=true -destination /opt/idempiere-server -repository https://jenkins.idempiere.org/job/idempiere-rest/ws/com.trekglobal.idempiere.extensions.p2/target/repository/ -i com.trekglobal.idempiere.rest.api
Notice that the commands above has to be written in one line so if you want to copy it, paste it in an editor first and remove the line breaks.
The destination and repository paths can also be URLs. The name of the feature is the ID of your feature in your feature.xml followed by ".feature.group"
Apache Felix Gogo Command Line Console
This is the recommended way when you don't have a p2 repository.
From this OSGi console you can execute command to manage the plugins like:
ss - display installed bundles (short status), for example ss rest shows information about plugins with "rest" in its name
install - install bundle using URLs
uninstall - uninstall the specified bundle(s)
setbsl - set the start level for the bundle(s)
sta - start the specified bundle(s)
sto - stop the specified bundle(s)
help - displays information about a specific command
Open the Apache Felix Gogo console on your server using telnet, like:
telnet localhost 12612
And within the OSGi console you can execute, for example to install the REST plugin from jenkins (this is an example, to work in real life you need to change the version and timestamp of the plugin):
1ss idempiere.rest
2uninstall com.trekglobal.idempiere.rest.api   # if previously installed
3install https://jenkins.idempiere.org/job/idempiere-rest/ws/com.trekglobal.idempiere.extensions.p2/target/repository/plugins/com.trekglobal.idempiere.rest.api_0.1.0.202501241521.jar
4setbsl 5 com.trekglobal.idempiere.rest.api
5sta com.trekglobal.idempiere.rest.api
Note that with this command you are installing a plugin from an https source, in case you downloaded the plugin and is available on a local folder server you can use instead the notation file://, for example supposing you have the plugin in your /tmp folder you can replace the third line of the instructions above with this one:
install file:///tmp/com.trekglobal.idempiere.rest.api_0.1.0.202501241521.jar
Apache Felix Web Console
Open your browser and visit the following url. Replace localhost:8443 with your server name and port.
https://localhost:8443/osgi/system/console/bundles
The login is SuperUser and the password you have set for the SuperUser. Or you can login with any System user having System Admin permissions.
Click on the Install/Update... button. Then click Browse and choose the jar file from your local folder and upload it. Configure your starting behavior, normally is just needed to check the Start Bundle and Refresh Packages then set the Start Level to 5, click Install or Update. Refresh the page and search your plug-in. It should have the state active. If not, try to start it with the "play" button.


