Developing Plug-Ins - Custom Info Windows
.
This How-To is brought to you by Jan Thielemann from evenos GmbH (www.evenos-consulting.de). If you have questions, criticism or improvement suggestions, feel free to visit me (Jan.thielemann) or write me an email
Goal of this How-To
The goal of this How-To is to show you how you can create your own custom Info Windows, either by code or via the Application Dictionary. You will also learn how you can overwrite the default Info Window for a given table.
Prerequisites
Before you start this How-To, you should take a look at the following How-Tos:
- Developing Plug-Ins without affecting the Trunk
- Developing Plug-Ins - Get your Plug-In started
- Developing Plug-Ins - IModelFactory
tl;dr
My video of the How-To is here
The Workflow
Preparing
Before we start implementing the Info Windows, we first have to create the custom tables in the database that will be used by the custom Info Windows.
Preparing the Database
Create a simple main table with one sub-table which links to its parent table by the record id column of the main table. Here are the SQL statements to create the tables:
create table jan_main(
  jan_main_id numeric(10,0) NOT NULL,
  jan_main_uu character varying(36) DEFAULT NULL::character varying,
  ad_client_id numeric(10,0) NOT NULL,
  ad_org_id numeric(10,0) NOT NULL,
  updatedby numeric(10,0) NOT NULL,
  updated timestamp without time zone NOT NULL DEFAULT statement_timestamp(),
  isactive character(1) NOT NULL,
  created timestamp without time zone NOT NULL DEFAULT statement_timestamp(),
  createdby numeric(10,0) NOT NULL,
  name character varying(60) NOT NULL,
  value character varying(60) NOT NULL
)

create table jan_sub(
  jan_sub_id numeric(10,0) NOT NULL,
  jan_main_id numeric(10,0) NOT NULL,
  jan_sub_uu character varying(36) DEFAULT NULL::character varying,
  ad_client_id numeric(10,0) NOT NULL,
  ad_org_id numeric(10,0) NOT NULL,
  updatedby numeric(10,0) NOT NULL,
  updated timestamp without time zone NOT NULL DEFAULT statement_timestamp(),
  isactive character(1) NOT NULL,
  created timestamp without time zone NOT NULL DEFAULT statement_timestamp(),
  createdby numeric(10,0) NOT NULL,
  name character varying(60) NOT NULL,
  value character varying(60) NOT NULL
)
Note: there are no constraints because this is just a quick and dirty How-To. In the production environment, you should add at least a unique constraint on the _ID and _UU columns, and maybe on the value/name columns as well, depending on your requirements.
Creating Tables, Columns, Windows, Tabs and Fields
Now we can create the windows and columns for our table. Take a look at the How-Tos mentioned in the prerequisites if you are not already familiar with this.
Basically, you open the Table and Column window, create a new entry, provide your table name (best practice here is to use upper case for the table prefix (custom tables should have a 3-letter prefix) and then use camel case for each word.
Then you run the process to create the columns. In the sub-table, you check the "parent linking column" checkbox for the jan_main_id field.
Then open the Window, Tab & Field window, create a new entry and add two tabs, one for the main table and one for the sub-table. Make sure the sub-tables tab has a higher tab level and sequence number than the main tab. Run the process to create the columns.
The last thing is to open the Menu window and create a new menu entry for our window.
Also make sure that you select the newly created window in the Table and Column windows Table tab for our JAN_Main table.
Adding a Search somewhere
For presentation purpose we have several ways to open a Info Window. The easiest could be to implement a Search field somewhere in the application. You can basically add a jan_main_id column to any table you like and make the column a "Search" in Table and Columns. You also could create a process and add the column to the processes parameters. The last option would be to implement a custom Info Window and run it from the menu.
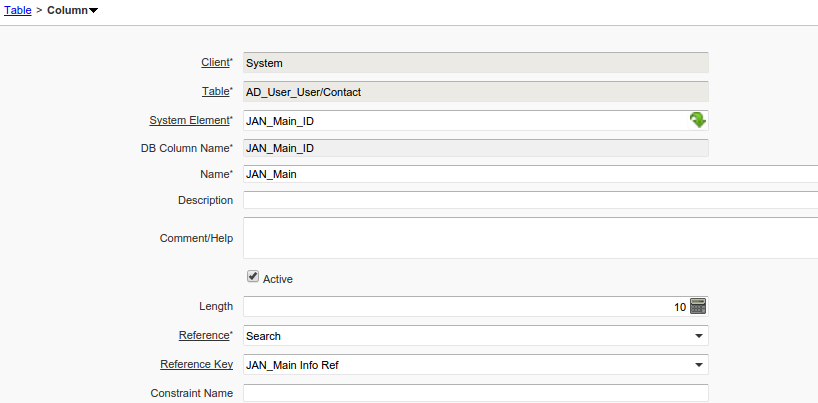
Let's go with the first way for now so i chose the AD_User table. Just open Tables and Columns, search for the AD_User table and in the columns tab, add a new column and use the System Element "JAN_Main_ID". Make sure that you changed the "Reference" to "Search" and check the "Updateable" checkbox. Then hit the Synchronize Column button so that the column gets added to the database.
Now we have to add the field to the user window. Again, open Window, Tab & Field and search the User window. Here use the process to generate the missing fields.
The default Info Window
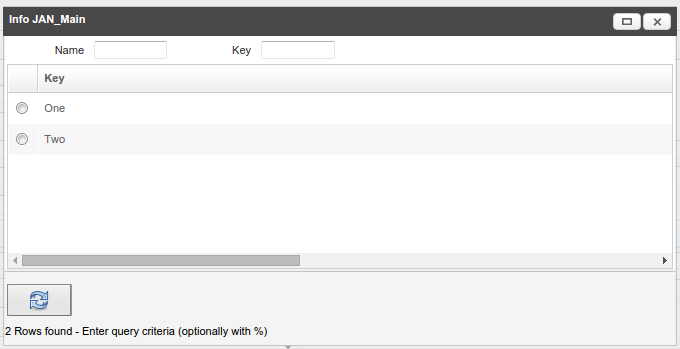
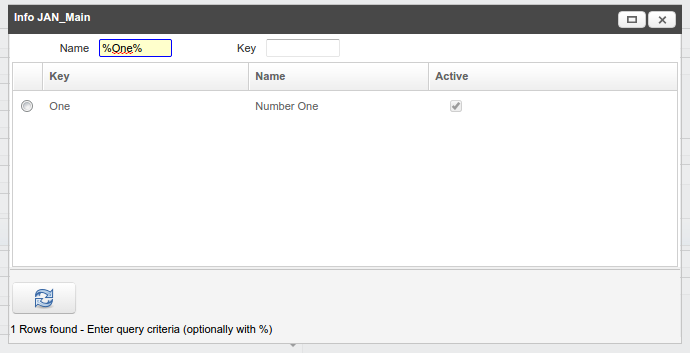
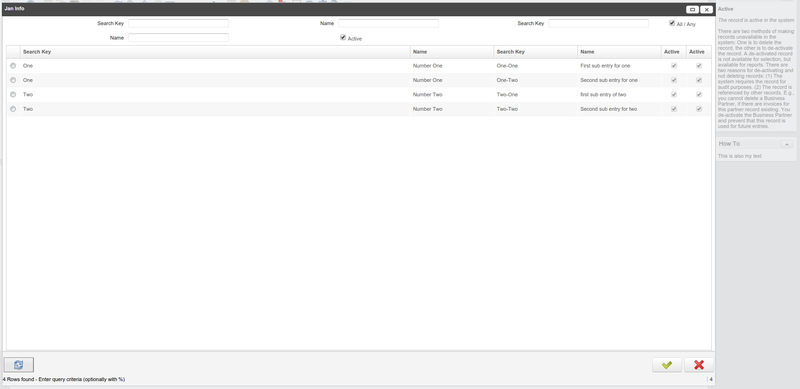
Now when you open the User window, you should see the new field. It has this little green arrow button. Hit it and the default Info Window opens. This one is provided by iDempiere and it currently shows the "Name" and the "Key" to filter data (at this point, you may want to add some data to our jan_main and jan_sub tables).

The following pictures shows the default info window and how you can filter in it:
The default info window is created by the DefaultInfoFactory and the class implementing the info window is InfoGeneralPanel.java. It has some limitations but if you can live with them then you are free to stop reading here. The limitations are the following:
- The maximum number of filter columns is 4
- Filter columns are determined by the following SQL
SELECT c.ColumnName, t.AD_Table_ID, t.TableName, c.ColumnSql
FROM AD_Table t INNER JOIN AD_Column c ON (t.AD_Table_ID=c.AD_Table_ID)
WHERE c.AD_Reference_ID IN (10,14)
AND t.TableName='JAN_Main'
AND EXISTS (SELECT * FROM AD_Field f WHERE f.AD_Column_ID=c.AD_Column_ID AND f.IsDisplayed='Y' AND f.IsEncrypted='N' AND f.ObscureType IS NULL)
ORDER BY c.IsIdentifier DESC, c.AD_Reference_ID, c.SeqNo
- Columns which are shown in the windows table are determined by the following SQL (replace the table id with your own one)
SELECT c.ColumnName, c.AD_Reference_ID, c.IsKey, f.IsDisplayed, c.AD_Reference_Value_ID, c.ColumnSql
FROM AD_Column c
INNER JOIN AD_Table t ON (c.AD_Table_ID=t.AD_Table_ID)
INNER JOIN AD_Tab tab ON (t.AD_Window_ID=tab.AD_Window_ID)
INNER JOIN AD_Field f ON (tab.AD_Tab_ID=f.AD_Tab_ID AND f.AD_Column_ID=c.AD_Column_ID)
WHERE t.AD_Table_ID=1000001
AND (c.IsKey='Y' OR  (f.IsEncrypted='N' AND f.ObscureType IS NULL)) ORDER BY c.IsKey DESC, f.SeqNo
- From the above list, not every column is taken. For example, AD_Client_ID has the display type Table Direct which is not taken. Only the following display types are used: ID, YesNo, Amount, Number, Quantity, Integer, String, Text, Memo, Dates, List (Ref and Table)
The Application Dictionary Info Window
You are reading this so i guess you need more power in your info windows. Or you are just curious. Either way, let's see how we can extend our default info window.
So what do we need in order to create a better info window? Basically we need to:
- Create a new table reference for our JAN_Main table
- Assign the reference to AD_User.JAN_Main_ID as the "Reference Key" in Table and Columns
- Create a new Info Window in the Application Dictionary
- Assign the Info Window to the reference
- Re-log to take the changes
Reference
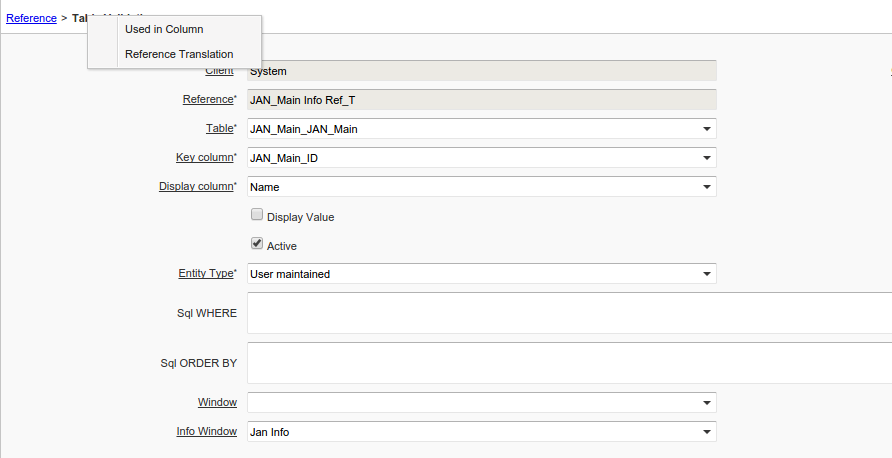
Okay, let's start with the reference. Open the Reference window and create a new entry. I called mine "JAN_Main Info Ref". Make it a Table Validation and save the entry. Go to the Table Validation tab and create an entry like this:
- Table: JAN_Main
- Key Col.: JAN_Main_ID
- Display Col.: Name
- Info Window: (fill later)
You are free to add some more validation of your data via the Sql WHERE here.
Table and Columns
Now open the Table and Columns window and search the AD_User table. Open the JAN_Main_ID column in the Column tab and select your reference as the Reference Key:
Info Window
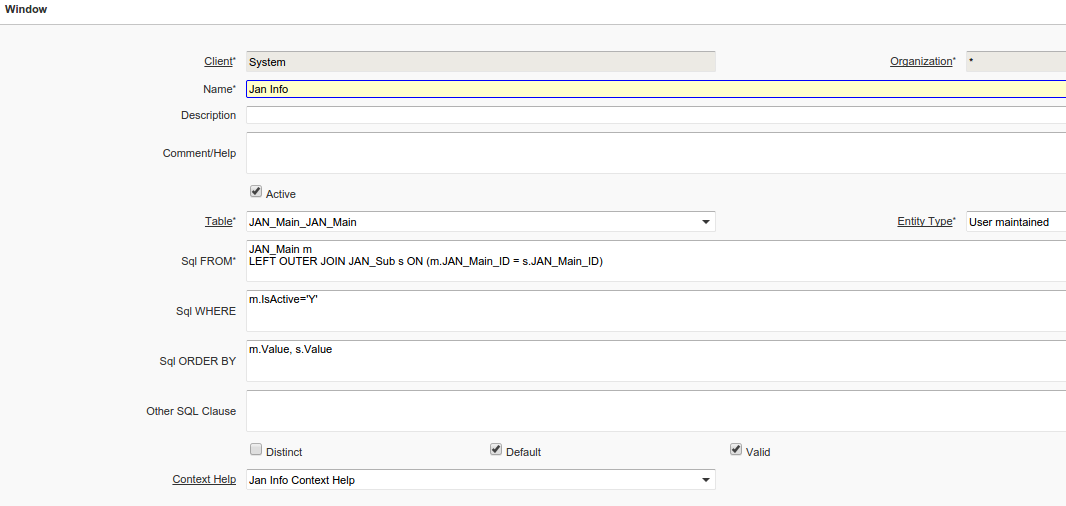
Okay so now open the Info Window window and create a new entry. For the table, chose JAN_Main. The SQL is something you should take your time to think about what you really want. In my case, i want to show the Value/Name/isActive of the JAN_Main entry AND the Value/Name/isActive of the JAN_Sub entry. But it can happen that a main entry has no sub entries. I also want to show those main entries so i make a simple left outer join. However, i only want to show JAN_Main entries which are active so i added the SsActive='Y' in my where clause. Notice that i use m.IsActive where m is my alias for JAN_Main in the Sql FROM field. In the next field, i sort my results by the JAN_Main.Value field and afterwards by JAN_Sub.Value. I also added Context Help (this is also a relatively new feature and if you haven't known about it until yet you may find it useful. I'll show you alter what it is).
The "Default" checkbox has an important function and which this is we will see in some minutes. For now save the entry and link it to your reference.
Open the Column tab and start adding your fields. I added (two times each) Value, Name and IsActive. Just enter it in the System Element field and the rest of this window is filled automatically. The only thing you really need to change is the Sql SELECT which is by default "m" in my case so i need to change it for the second Value, Name and IsActive column to "s.". What each of the fields does is explained here: Info Window.
What else i did is, i unchecked the "Query Criteria" for the JAN_Main isActive field since i already filter for this in Info Window definition.
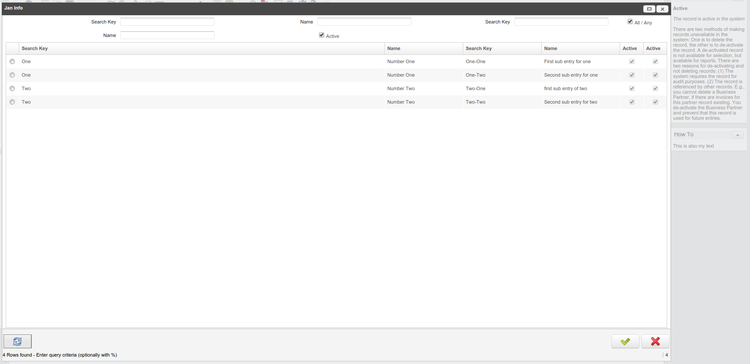
Save all your work and go back to the Info Window main tab. Here run the process "Validate". Once it is validated, log out and back in again so the changes take effect. Open the user window and hit the search button on our search field. Look what happened:
You see, something has changed. We see our 5 filter columns. Also theres the All/Any checkbox. This checkbox is used to apply either any filter at the same time or to show criteria which maches at least one of the filters. Also take a look at the right side of the image. Have you notices the "How To" panel which appeard in the help section of the application? This is what our context help does. Check out the wiki to get more information about it.
Why we use the Reference
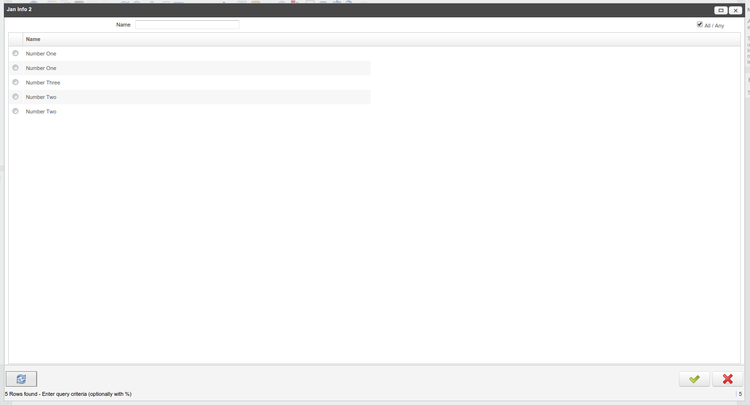
That is a good question. Basically we wouln't need the Reference and we wouldn't need to assign it to the Column in the Table and Column window. We could check the Default checkbox in the Info Window definition and it would take our Info Window everytime we use JAN_Main_ID in another window as a search reference. However, you may wan't do display a different Info Window in some cases. This is where the reference comes into play. You can define a default Info Window and also other Info Windows for the same table. Then you can use the Reference to precisely define when to show which info window. Take a look at the following pictures. I added another JAN_Main_ID column to the user window. One of the columns uses the default window. The other field uses another customizes Info Window via the Reference way:
The coded Info Window
Okay so you want even more power? Than you may want to develop your own info window. The good news is: thats easy to do since we use OSGi. The bad news is: programming is still harder than configuring your info window via the Application Dictionary.
What you need to do is:
- Create a Plug-in
- Create a class which is used as a factory
- Create a component definition
- Implement the IInfoFactory (either from the org.adempiere.ui.swing or org.adempiere.ui.zk depending on which client you want to extend)
- Create a class which extends InfoWindow (zk client)
- Create a class which extends Info (swing client)
I won't show you how to fully implement one of those Info Windows in code but if you really want to do it, you should be able to get a quick start by taking a look at other implementations of InfoWindow.java which are for example:
- InfoAssetWindow.java
- InfoAssignmentWindow.java
- InfoBPartnerWindow.java
- InfoInOutWindow.java
- InfoInvoiceWindow.java
- InfoOrderWindow.java
- InfoPaymentWindow.java
- InfoProductWindow.java
Or their swing equivalents:
- InfoAsset.java
- InfoAssignemnt.java
- InfoBPartner.java
- InfoInOut.java
- InfoInvoice.java
- InfoOrder.java
- InfoPayment.java
- InfoProudct.java
Overwrite a default Info Window
When you use a factory for your info windows, you are able to overwrite default info windows from the system so make sure that in your factory you check for the table/column to decide when you want to return a custom info window of yours or to ignore the request. Also make sure that in your component definition you added the "service.ranking" property (which is an integer) and gave it a value greater than 1. Otherwise it can happen that the DefaultInfoFactory is called before your own implementation.
How you can overwrite a default info window which was defined in the Application Dictionary you have already seen. Just use the Reference method.
Open a Info Window from the Menu
If you defined your Info Window via the Application Dictionary, all you need to do is create a new menu entry, chose the Action Info and select your Info Window.
Open a Info Window from the Views Dashboard Panel
If you want your Info Window to appear on the Views Dashboard Panel, you need to do some coding. You need to alter the class DPViews.java. Another way could be to create a custom theme and change the class in theme/<theme_name>/dashboard/views.zul and implement your own class (probably clone DPViews.java).
Custom Button Image in Search Editor
If you want the search editor to show a custom button for your table like it does for products and business partners for example, then you need to clone the WSearchEditor and add your custom image in init(). You then need to provide your custom editor instead of the default one via a editor factory. How you can do this you can learn in another How-To on this wiki.


