Plugin: BX Service Metabase
- Maintainer: Carlos Ruiz - BX Service GmbH
- Status: Tested with release 8.2
- License: GPLv2
- Sources: GitHub de.bxservice.metabase
- JAR Installer: de.bxservice.metabase_1.0.3.202105261605.jar
- Integration with: Metabase
Description
- This plugin integrates metabase dashboards to be shown in different parts of iDempiere:
- BI Dashboard Form
- Home dashboard
- Field
- Quick Info
- Report output
- YouTube video
Configuration in Metabase
Server
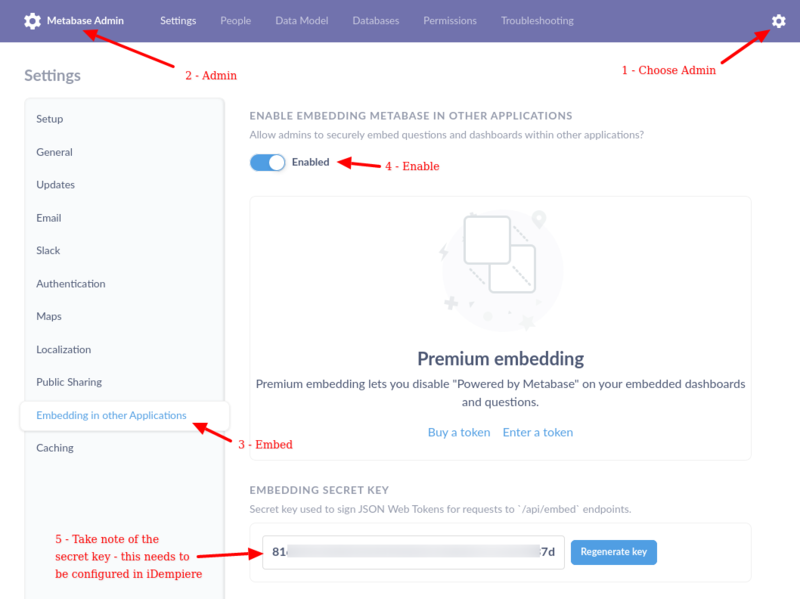
First you need to enable embedding in metabase, this generates a secret key that is required in iDempiere:
Dashboard
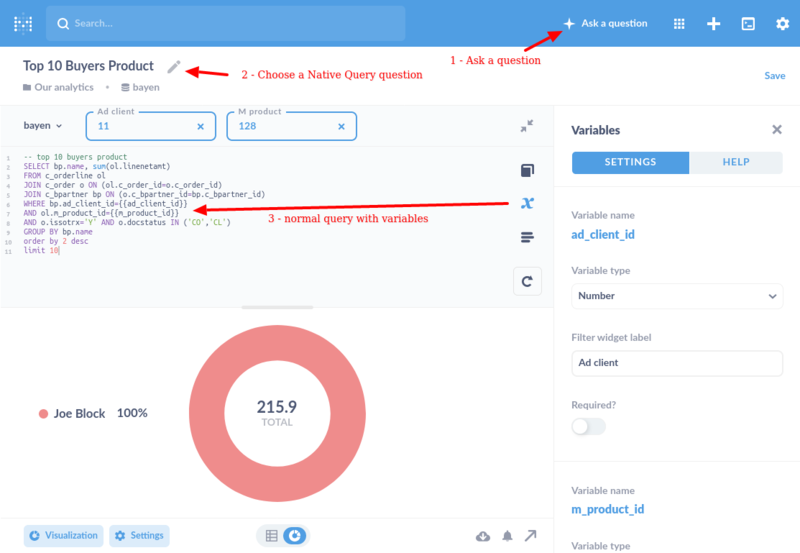
You create questions in Metabase.
The parameter ad_client_id is ALWAYS passed, so is better to use native query questions that support parameters (as of version 0.39.2 of metabase still doesn't support variables in other types of queries, just native):
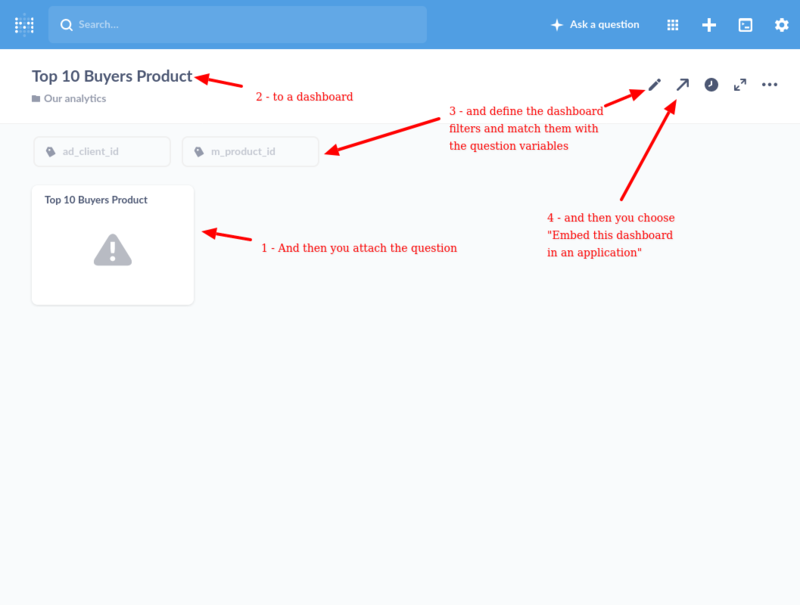
Attach the question to a dashboard, set up filters and match the filters with the question variables:
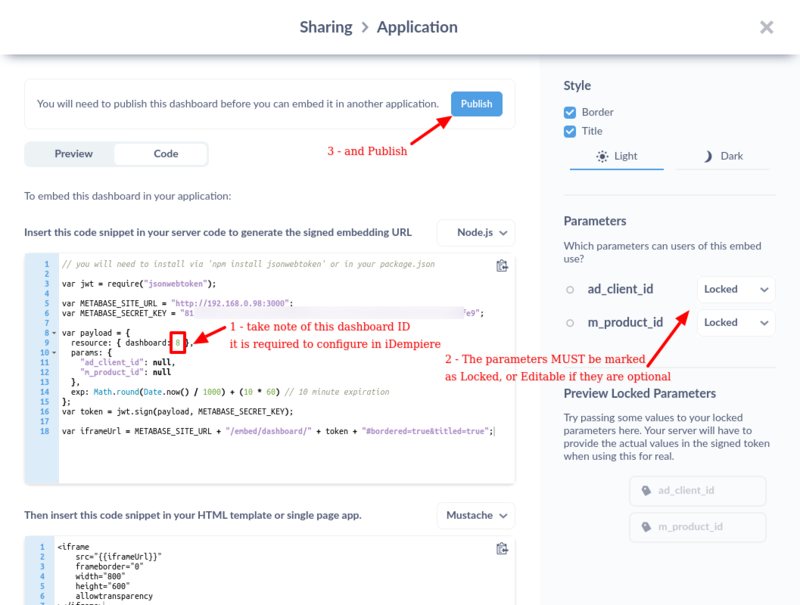
Configure embedding the dashboard in other applications, here is important to take note:
- The dashboard ID is required in iDempiere
- The parameters must be marked as Locked, or Editable if they are optional
Configuration in iDempiere
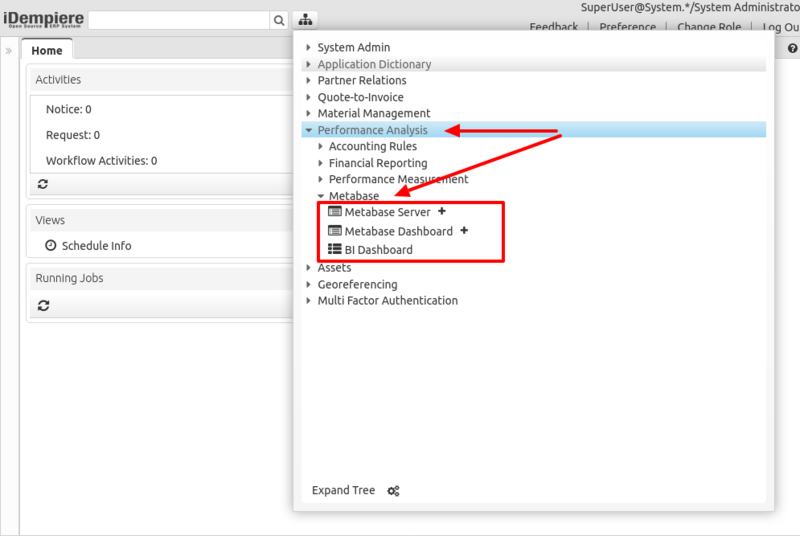
You can find the menu options for Metabase in Performance Analysis > Metabase:
Metabase Server
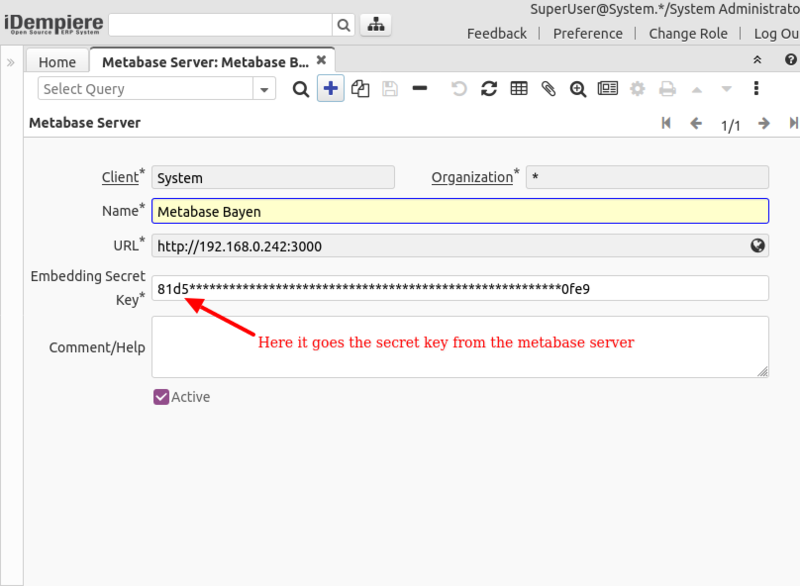
In the window Metabase Server you need to configure:
- URL: the URL where the metabase is located (usually this must be the same server as iDempiere, see Security Considerations below)
- Embedding Secret Key: here you must enter the secret key that metabase generated
Metabase Dashboard
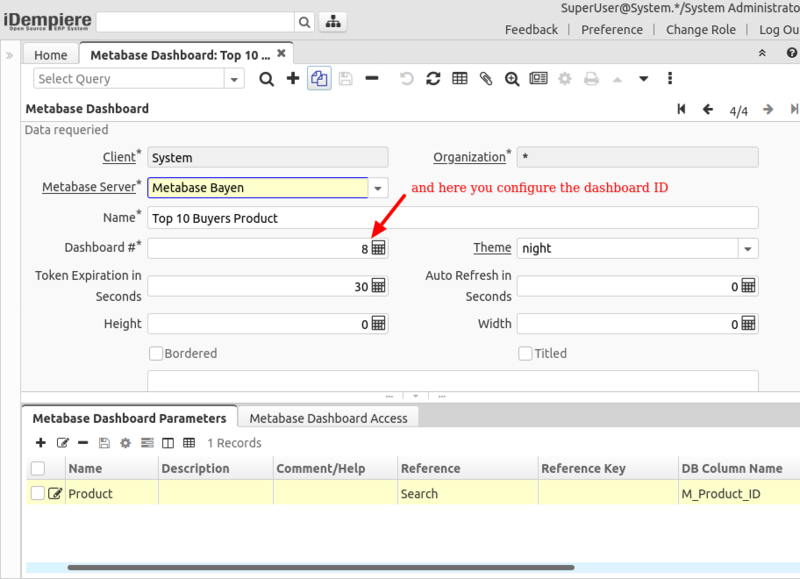
In the window Metabase Dashboard you can configure the different dashboards that you want to embed into iDempiere:
- Metabase Server: The server where the dashboard is found
- Name: The name of this dashboard
- Dashboard #: The number, here is the second connection with metabase configuration, this is the dashboard ID that you took note above
- Theme: select a theme supported by metabase
- Token Expiration in Seconds: This is a security option, how long the generated URL will be valid, a very long expiration time can expose the data on your server so is recommended to keep this low
- Auto Refresh in Seconds: For the BI Dashboard window to auto-refresh every this configured seconds
- Height, Width: If you want specific dimensions for the dashboard, otherwise, just leave it in zero and will use the metabase settings
- Bordered, Titled: If you want metabase to show a border and a title on the dashboard
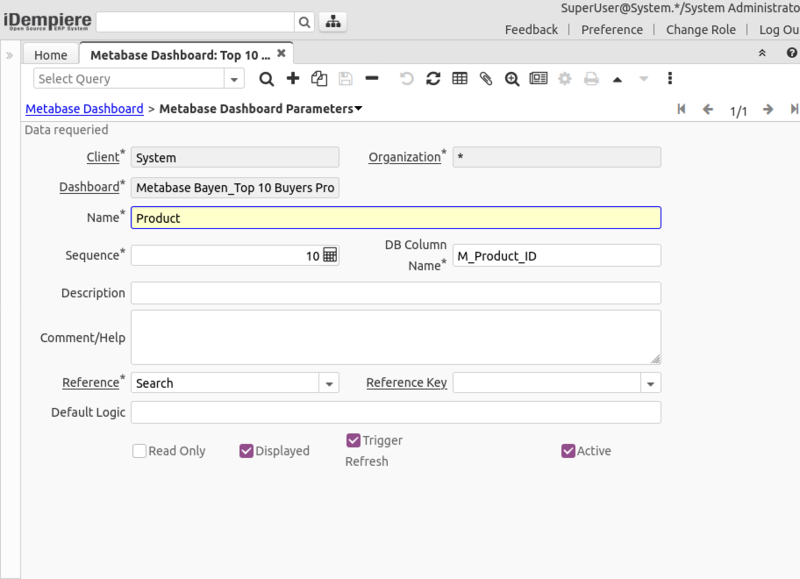
Then you need to define the parameters of the dashboard:
- Name: The name of the parameter, to be shown to the user
- Sequence: Sequence to order the capture of the parameters
- DB Column Name: The internal name of the parameter, this MUST match the name of the filter configured for the dashboard, is NOT case sensitive
- Description, Help: For your notes
- Reference, Reference Key: The type of the parameter, as usual in iDempiere dictionary
- Default Logic: The default logic, as usual in iDempiere dictionary
- Read Only: If the parameter is read-only
- Displayed: If the parameter is displayed
- Trigger Refresh: In the BI Dashboard form defines if changing the value of this variable triggers a refresh of the dashboard
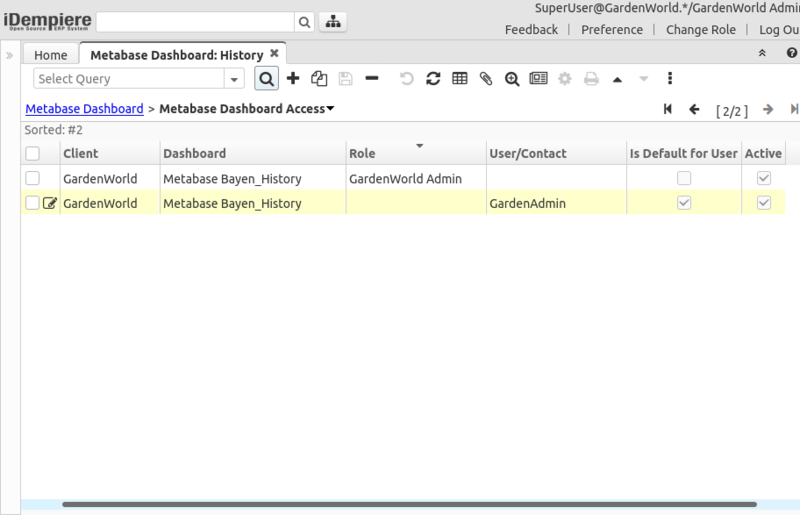
Then you can define the access to the dashboard per user or role. You can define the server and dashboards in System and give permissions in Tenant, or you can define the dashboard in the Tenant too:
- Role: If the role has access to this dashboard, or
- User: If a specific user has access to this dashboard
- Is Default for User: When defined for a user, it defines if the BI Dashboard form will show this dashboard for the user by default when opened
BI Dashboard Form
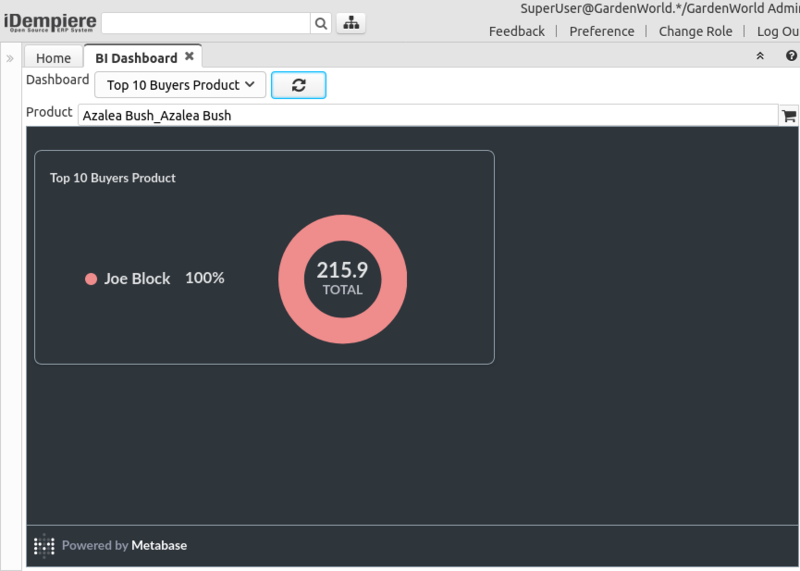
The configuration above is enough for the BI Dashboard form.
The user needs to open the form, select a dashboard, and fill the parameters. For a more direct experience the dashboard can be set to open a default dashboard for the user, and prefill the parameters with defaults:
Home Dashboard
NOTE: This option is available in release 8.2 after version 2021-05-21
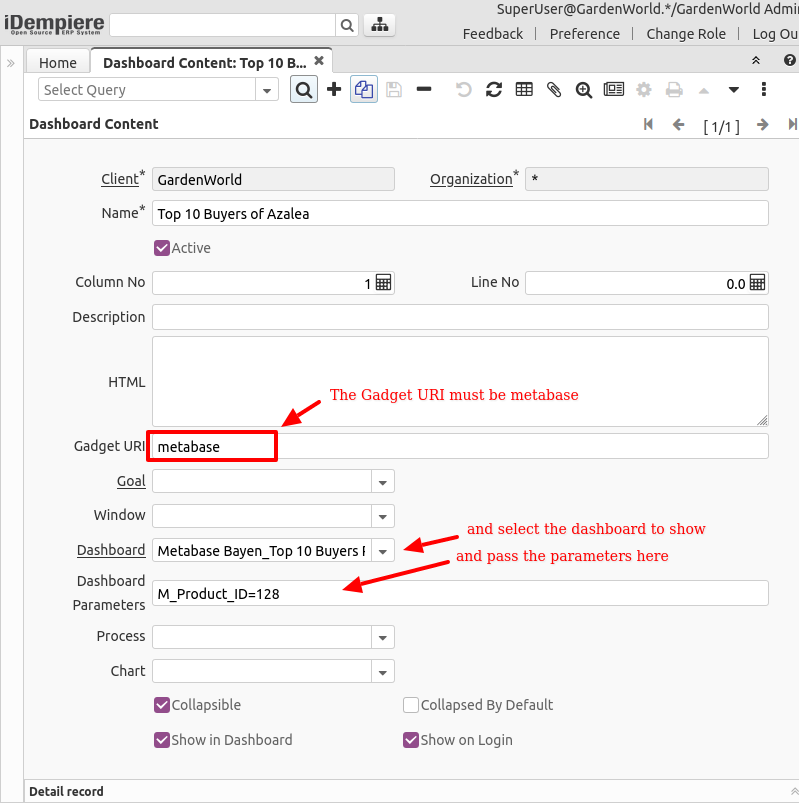
To show a metabase dashboard as a Home dashboard you need to configure a new record in the Dashboard Content window, key fields:
- Gadget URI: this needs to be
metabase - Dashboard: select here the metabase dashboard to embed
- Dashboard Parameters: pass here the dashboard parameters, this works the same as the process parameters in the same window, you can pass multiple parameters defined as
name=valueseparated by comma,. Instead of value you can also define a query using@SQL=prefix.
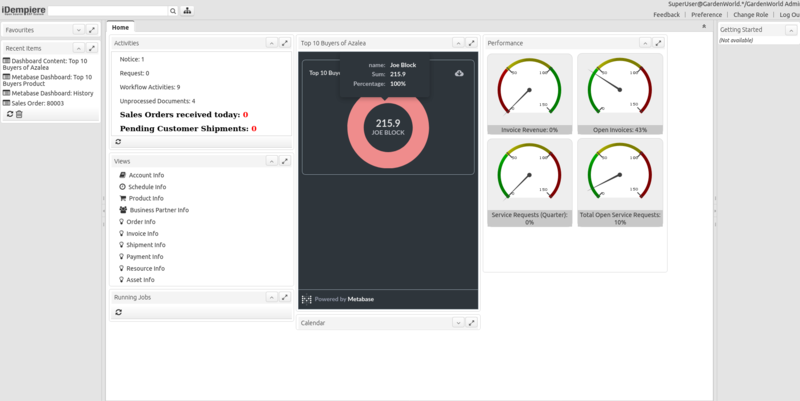
The resulting dashboard looks like this at home:
Field
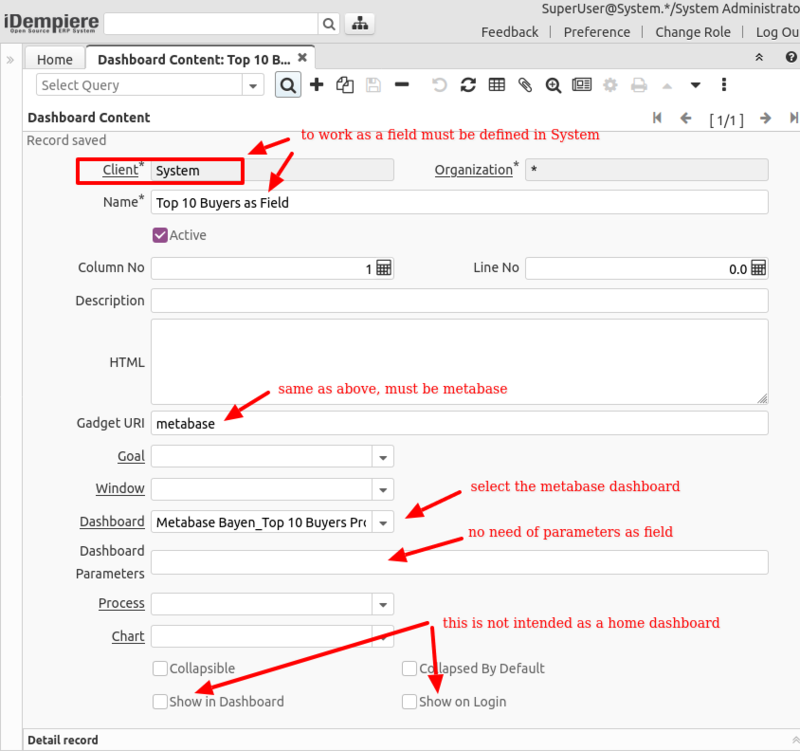
It is possible to show a dashboard content as a field, for this to work you need to define your dashboard content in System tenant, there is no need to pass parameters in this case as they will be discovered in the window. Also these kind of dashboards are not intended for the Home, so the options to Show in Dashboard and Show in Login are disabled:
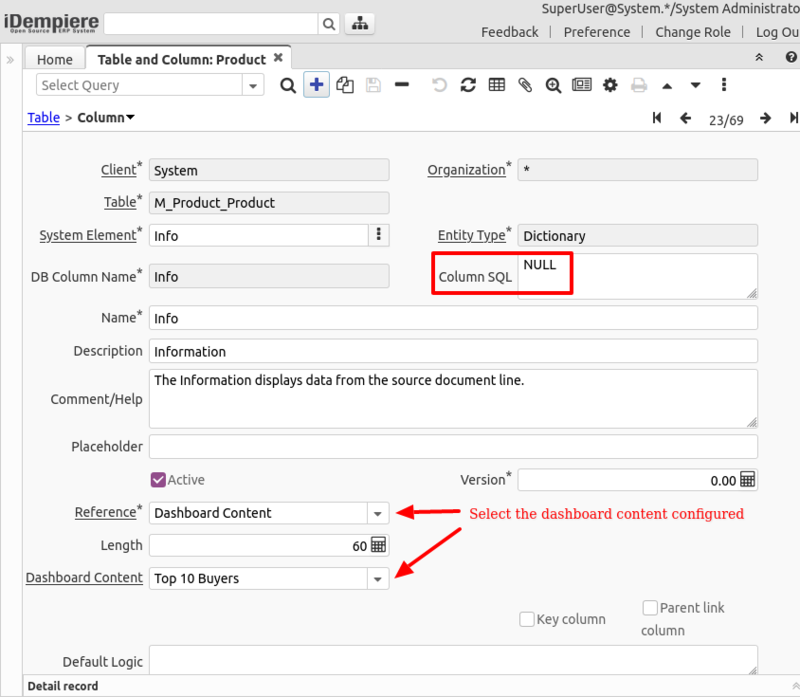
Then you can configure a column in the desired table (in this example M_Product):
- note the usage of Column SQL as NULL, this is to avoid the need of creating a column in the database
- in the Reference you select Dashboard Content
- and in Dashboard Content field you choose the dashboard configured above
Of course, do not forget to create the corresponding field in the window.
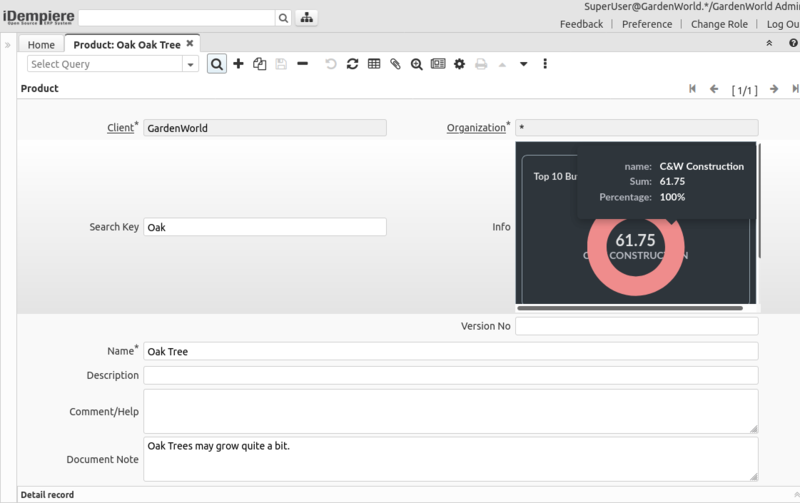
The result is rendered in the window.
Note that the parameter of this dashboard M_Product_ID is taken from the corresponding window field, and the dashboard is refreshed every time a new record is navigated:
Quick Info
NOTE: This option is available in release 8.2 after version 2021-05-26
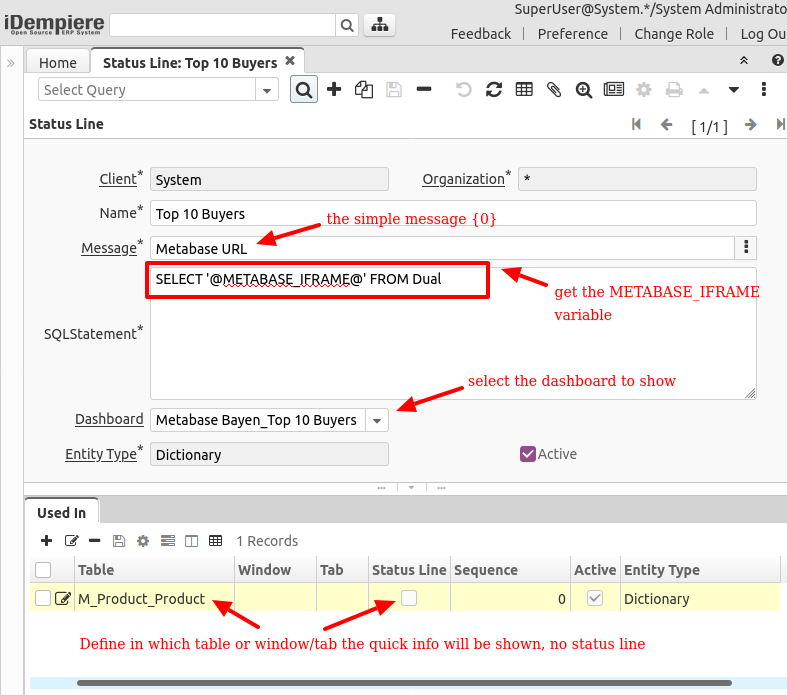
It is also possible to show the metabase dashboard in Quick Info, there can be several ways to make this work, the key part is that the metabase plugin injects a context variable with name METABASE_IFRAME
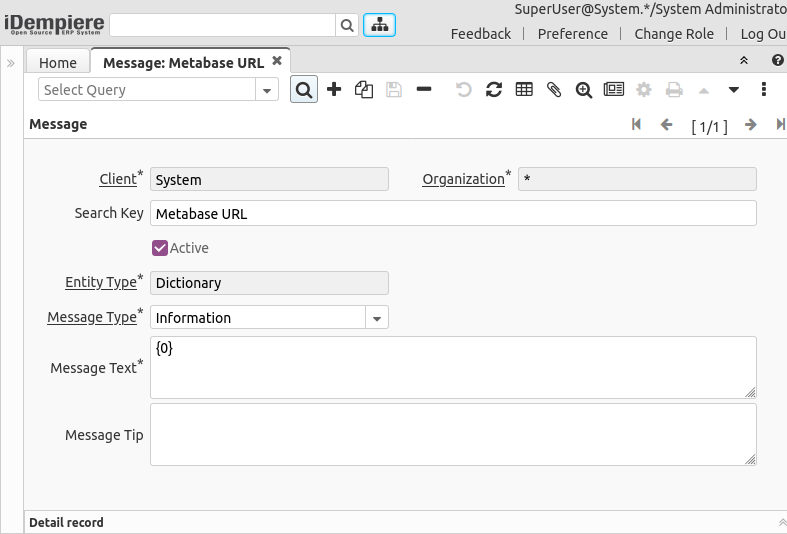
Based on that, there can be several ways to configure this, one for example is to configure first a Message, just containing a placement for a string variable:
Then configure a record in Status Line:
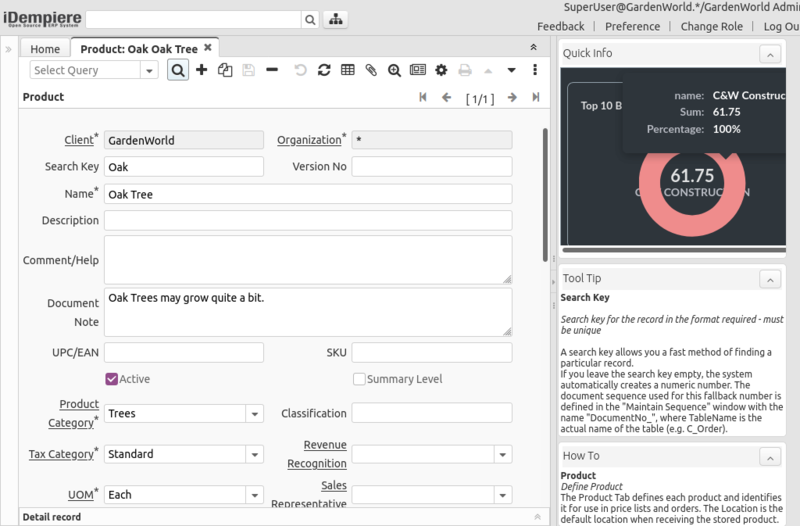
The result will be shown in the Quick Info panel.
Same as with the field, the parameter of this dashboard M_Product_ID is taken from the corresponding window field, and the dashboard is refreshed every time a new record is navigated:
Report Output
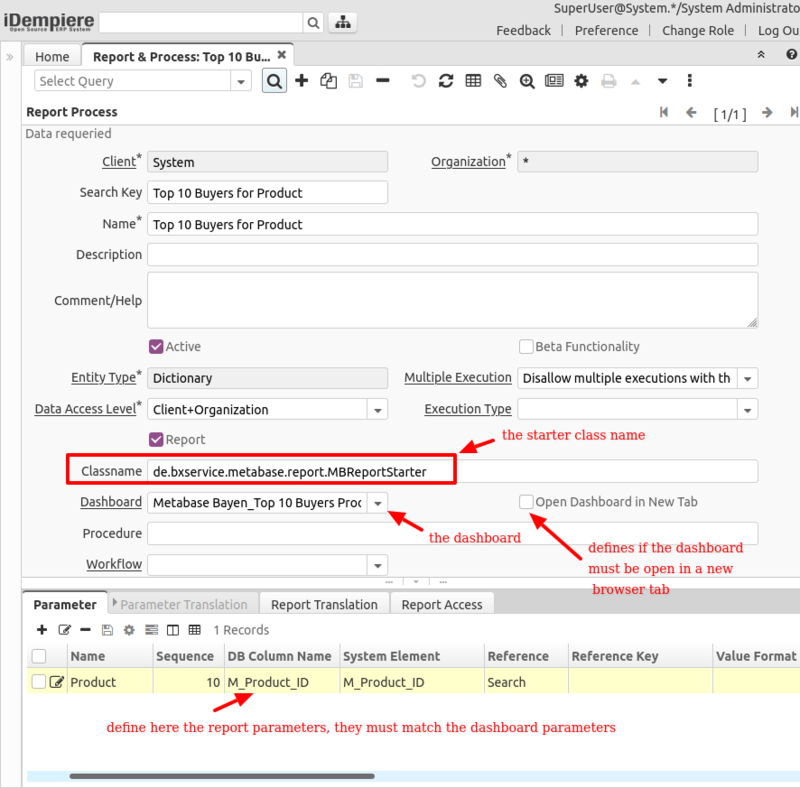
Metabase dashboards can also be integrated to be shown as reports. For this you need to define in dictionary a report this way:
- Classname:
de.bxservice.metabase.report.MBReportStarter - Dashboard: select the dashboard to display
- Open Dashboard in New Tab: this defines if the dashboard is displayed opening a new browser tab. For this to work you must give permission to iDempiere site to open new tabs in your browser
- Parameters: You must configure the parameters for the report, this must match the same parameters as the dashboard
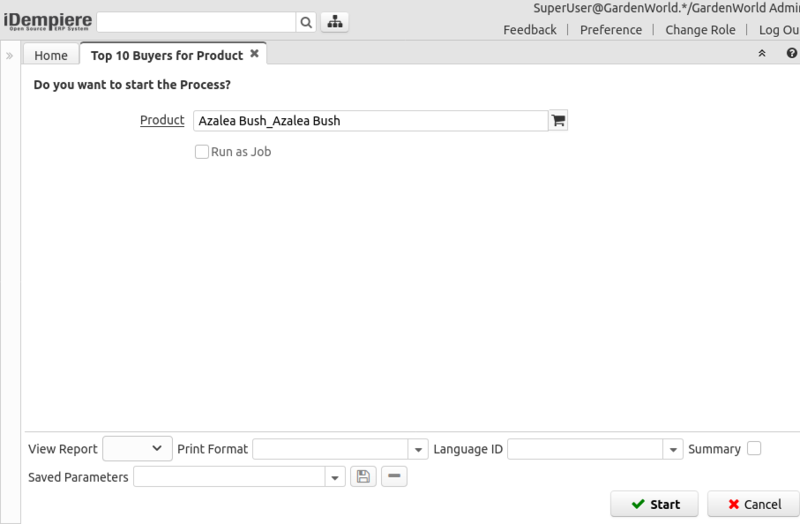
The report then is executed the same as any iDempiere report:
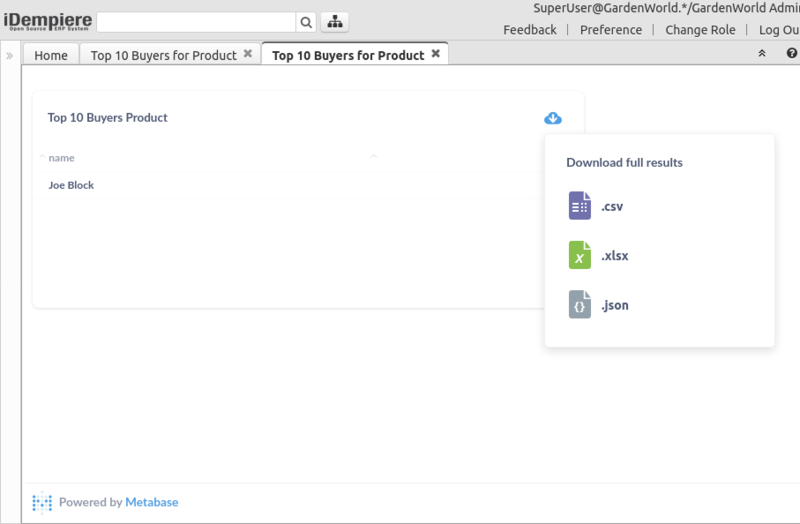
And the output is rendered directly, note that when opening in a new tab, the URL will be fully visible and this URL could be used in a different browser within the token expiration time (see security notes below).
Metabase questions allow to download the data as CSV, XLSX or JSON.
Security Considerations
Embedded Sharing
This plugin uses the feature Embedded Sharing from metabase which is the recommended way.
Please note in this case metabase doesn't require a user or a password, the security is based solely in the secret key and the token expiration.
The security mechanism is generating a JWT token signed with the secret key and with an expiration time as configured, this JWT token is passed to the URL and metabase authenticates it.
Secret Key
The secret key is, as its name indicates, intended to be secret, if this key is leaked then an external party could be able to access your dashboards generating and signing the JWT token.
If you think the secret key is leaked then you can go to metabase and regenerate a new key, and configure it accordingly in iDempiere. Anyways, this procedure is recommended to be done periodically.
Token Expiration
The token expiration is important also because the URL is easily accessible in a browser via the developer console, and it could be shared by a user with external people. So, is a security measure to make the token expire as soon as possible, so other people cannot access it even having the same URL.
Encrypted Parameters in URL
Please note the URL generated contains all the parameters passed in an obscure way, but this is easily visible with any JWT tool.
Because of that, DO NOT PASS SENSITIVE INFORMATION as parameters, for example credit cards, passwords, etc.
Avoid Public Sharing
Metabase has another way to embed dashboards enabling a feature called Public Sharing.
Unless you want your data to be publicly available this option is not recommended.
In other words, public sharing is really public, even if embedded with a hard-to-guess URL, is very simple to find that URL in the browser developer console and share it with other people, this kind of public sharing doesn't require any authentication, so other people without access to your system will be able to view your dashboards.
X-Frame-Options "SAMEORIGIN"
A recommended security measure is to avoid frames from different origins, and that is the default setup in iDempiere, and the recommended for http proxies (like nginx or apache).
For example in nginx the recommended setting is:
add_header X-Frame-Options "SAMEORIGIN";
As the integration is based on embedding a framework from metabase, it is necessary that the origin of this framework must be the same as iDempiere.
The recommended approach is to use the same http proxy to manage the metabase URLs, for example in nginx would be something like:
location /embed {
    proxy_pass        http://localhost:3000/embed;
    proxy_set_header  X-Real-IP $remote_addr;
    proxy_set_header  X-Forwarded-For $proxy_add_x_forwarded_for;
    proxy_set_header  Host $http_host;
}
Licensing Considerations
The metabase license is AGPLv3, in theory is not fully compatible with iDempiere GPLv2, but this must not be a problem as the integration is externalized, there are not metabase code or libraries used in this plugin.
However, on the metabase side, the embedding mechanism uses a piece of code which is not pure open source, this is the METABASE APP-EMBED-PREMIUM.JS SOFTWARE LICENSE AGREEMENT, this license basically forbid that you change the metabase code to remove the Powered by Metabase message at the bottom of the dashboard.
You can find more information about that in the URL https://store.metabase.com/product/embedding
Database Performance Considerations
BI dashboards can heavily hit the database, so is always recommended to implement database replication and point Metabase to use the replica instead of the production database.
Installation
You can download the JAR Installer linked at the top of this page and install it using the iDempiere Felix Console, or alternatively you can install it directly from the OSGi Console with the link, the recommended base start level for the plugin is 5.

