How to activate the POSSync and OrderSync buttons
Introduction
POS_ACTIVEMQ is a stand-alone java application with it's own database but to fully experience it you need to activate its ERP side. I mean by fully that you can have your data stored at a central point and you can retrieve all or part of it at wish from any where in this world for any number of POS. Thus no need replicating data. The best part in this is that you can do all of that asynchronously. So for this "how-to" we need to Download Apache ActiveMQ and the Idempiere server. A source release will be compiled on your own machine while a binary release must match your operating system.
This are the links I used,
http://activemq.apache.org/download.html
http://www.idempiere.org/downloads
Please recall I'm using the 32 bits version of Ubuntu 12.04.
Adjusting Configurations
If you have followed my footprints and reached here, then your POS-Synchronization buttons should return you an error. The
The steps to follow to activate these are quite simple.
The problem arises because the openbravo.properties files is not included in the PostgreSQL database create script. It is found in com.openbravo.pos.templates. You will have to add that yourself by modifying the script and then create a new PostgreSQL database.
The scripts are found in com.openbravo.pos.scripts you are looking for PostgreSQL-create.sql
  INSERT INTO RESOURCES(ID, NAME, RESTYPE, CONTENT) VALUES('31',
  'openbravo.properties', 0,
  $FILE{/com/openbravo/pos/templates/openbravo.properties.txt});
I think if you go to maintenance > resources you can create the openbravo.properties file there with the content below
  <?xml version="1.0" encoding="UTF-8" standalone="no"?>
  <!DOCTYPE properties SYSTEM "http://java.sun.com/dtd/properties.dtd">
  <properties>	<comment>Openbravo Websevice configuration</comment>
  <entry key="url">http://192.168.1.2:8088/ADInterface/services</entry>
  <entry key="id">11</entry>
  <entry key="org">11</entry>
  <entry key="pos">HQ Warehouse</entry>
  <entry key="user">test</entry>
  <entry key="password">adempiere</entry>
  <entry key="queue-host">localhost</entry>
  <entry key="queue-port">61613</entry>
  <entry key="orders-queue">/queue/Orders</entry>
  <entry key="products-queue">/queue/Products</entry>
  <entry key="customers-queue">/queue/Customers</entry>
  </properties>
Now dear friend, if you press on that button again, the POS will know where it has to collect it's queues and that is at localhost. Normally, though it will tell you that there are no data to sync. That's expected because I've not yet shown you how to setup Apache ActiveMQ nor Idempiere server.
Idempiere Side
There's a tutorial about this on the idempiere wiki on http://wiki.idempiere.org/en/Installation_on_Debian. You just need to have the server up and running.
1. Extract the binary to the directory you want to say home/user_name. Then open your terminal and move to the directory immediately preceding our "IDEMPIERE_HOME" enter the command without the double quotes.
chmod -R 777 /home/user_name/idempiere.gtk.linux.x86
2. To Setup and install the server, run the setup.sh file.
./setup.sh
You should see some interface appearing.
Now here remember that you have to press "TEST" before you save.
3. You have to configure, the Java home because without Java this stuff won't run.
If you haven't installed Java yet I'be seen some nice tutorial on the web. You can go look for one yourself but allow me to propose this one HTTP://WWW.webupd8.org/2012/01/install-oracle-java-jdk-7-in-ubuntu-via.html.
4. So the next event will be to point to our "IDEMPIERE_HOME". Hint: You ought to browse until you see the bunch of packages.
So now that is done you now have the right to run the idempiere-server.sh file(it's in that same directory)
./idempiere-server.sh
The server should be starting.
5. There is one thing you lack though and that would be the imports to our Idempiere server.
so move(through the terminal) into the utils folder of Idempiere server.
Normally, there should be a "myenviroment file" there. I mean "myEnviroment.sh" not something else. So then if you find it.
run :
./RUN_ImportIdempiere.sh
That will import the things we need. Restart that server (idempiere-server.sh).
6. Now, to access the osgi console you need to find the telnet number .
It's in the idempiere-server.sh, a five digit number looking like "12612".
That's it you are good to go!!
$ telnet 12612
7. Now, you have to install the POS integration plugin through the OSGI console
install http://downloads.sourceforge.net/project/red1/p2/POSIntegration/plugins/POSIntegration_1.0.0.201310041922.jar
8. Login to your Idempiere server
   UserName: SuperUser
   Password: System
9. Select Role
    Client: GardenWorld
    Role: GardenWorld Admin
    Org: HQ
10. Then search for the openbravo plugun workflow, a few things are yet to be found. Search for Role Access Update
Move out then login back.
Apache ActiveMq
Apache ActiveMQ is an open source message broker written in Java together with a full Java Message Service (JMS) client. It provides "Enterprise Features" which in this case means fostering the communication from more than one client or server.
Simple (or Streaming) Text Oriented Message Protocol (STOMP), formerly known as TTMP, is a simple text-based protocol, designed for working with message-oriented middleware. It provides an interoperable wire format that allows STOMP clients to talk with any message broker supporting the protocol. It is thus language-agnostic, meaning a broker developed for one language or platform can receive communications from client software developed in another language.
Once you have downloaded the binaries
1. Extract into tmp
tar xvzf apache-activemq-5.10.0-bin.tar.gz -C /tmp/
once in tmp move to the opt
sudo su -c "mv /tmp/apache-activemq* /opt/"
2. Run active mq. Move to the directory where you installed activemq
cd apache-activemq-5.10.0/bin$
There type the following
./activemq console
By Default:
 password: admin
 username: admin
Parting Shots
We are almost there.
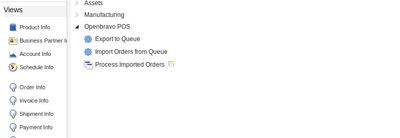
1. Now, you have to click on the export to queue in the Idempiere server.
2. Send Export to ActiveMQ
3. Press PosSync button in the POS_ACTIVEMQ
That's it. Next event How to import categories without killing the previous products


