- Maintainer: Diego Ruiz
- Status: Stable
- License: GPLv2
- Sources: GitHub
- Video Tutorials: Kanban Board in action and Red1's Review
- JAR files: Download
Description
- This plugin extends iDempiere with a new functionality to implement Kanban Boards
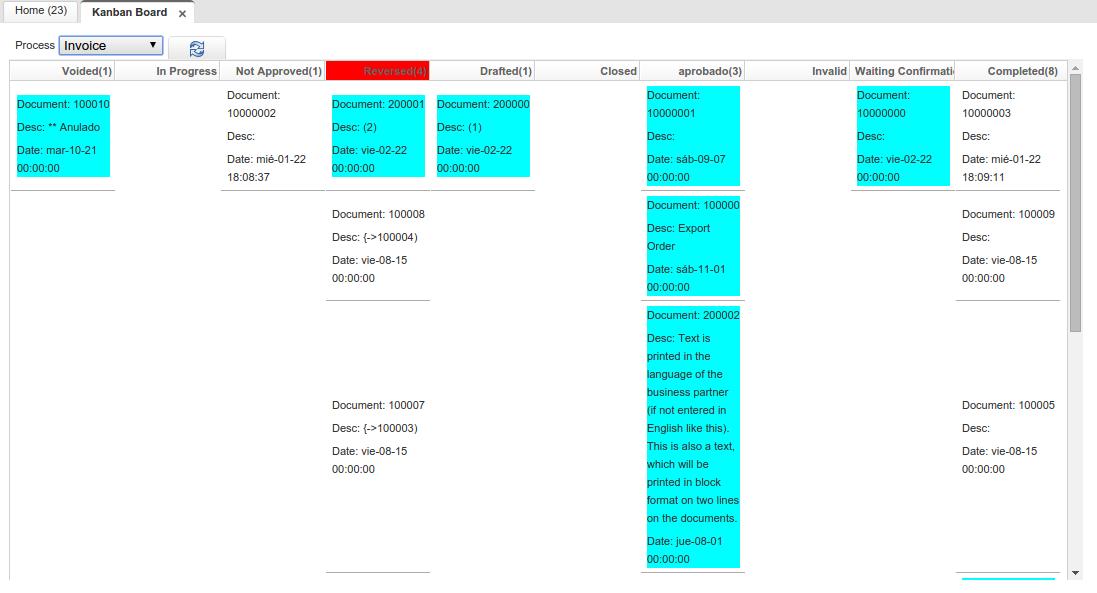
- The Kanban Board shows you an overview of the process you want.
- You can define the states of a process based on a List or a Column.
- You can move a card from one state to another by drag and drop.
- You can sort the cards by priority.
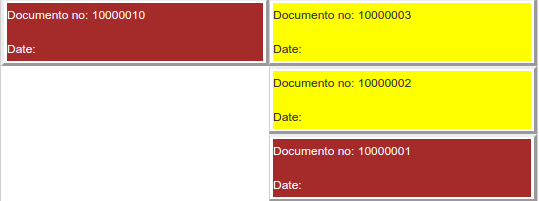
- See the cards on different colors according to their priority value.
- Manage who can interact with the board and who can't.
- Set the info that you want to see in each card.
- Use the SQL Queue field to set a rule that sends every document that satisfies it to a queue until the condition is resolved
- Control your WIP setting the max number of cards allowed in one status
The plugin adds three Windows: Kanban Board Configuration, Kanban Status Configuration, Kanban Board
If you want to provide additional comments, please use the Discussion page
Configuration
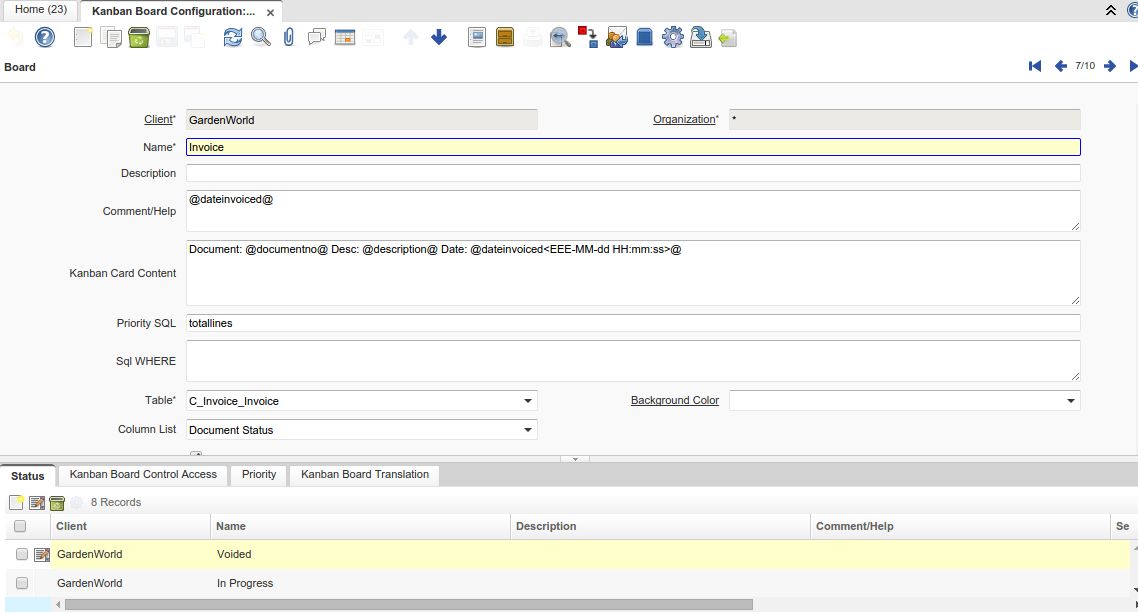
This window allows the user to create and configure a Kanban board. You must choose the process to be modelled in the Kanban Board (Ex: Invoice Process -> C_Invoice). Then you choose a ref List or a column to set the statuses. If you want to limit the results to display, you can do it with a SQL statement in the "SQL WHERE" field. Ex: If you want to display the unpaid invoices, you must fill this field with: is Paid='N'
- NEW
New SQL Order By field. You can choose how to order the cards on your board. If you leave this field empty the order will be set by the priority rule.
Priority Rule Configuration
This field must be filled if you want to sort the cards by some rule or field, the value must be a valid SQL statement associated with the process's table.
If you want to use the functionality to print cards by colors depending on its priority, this field must return a numeric value.
Priority Change within the Kanban
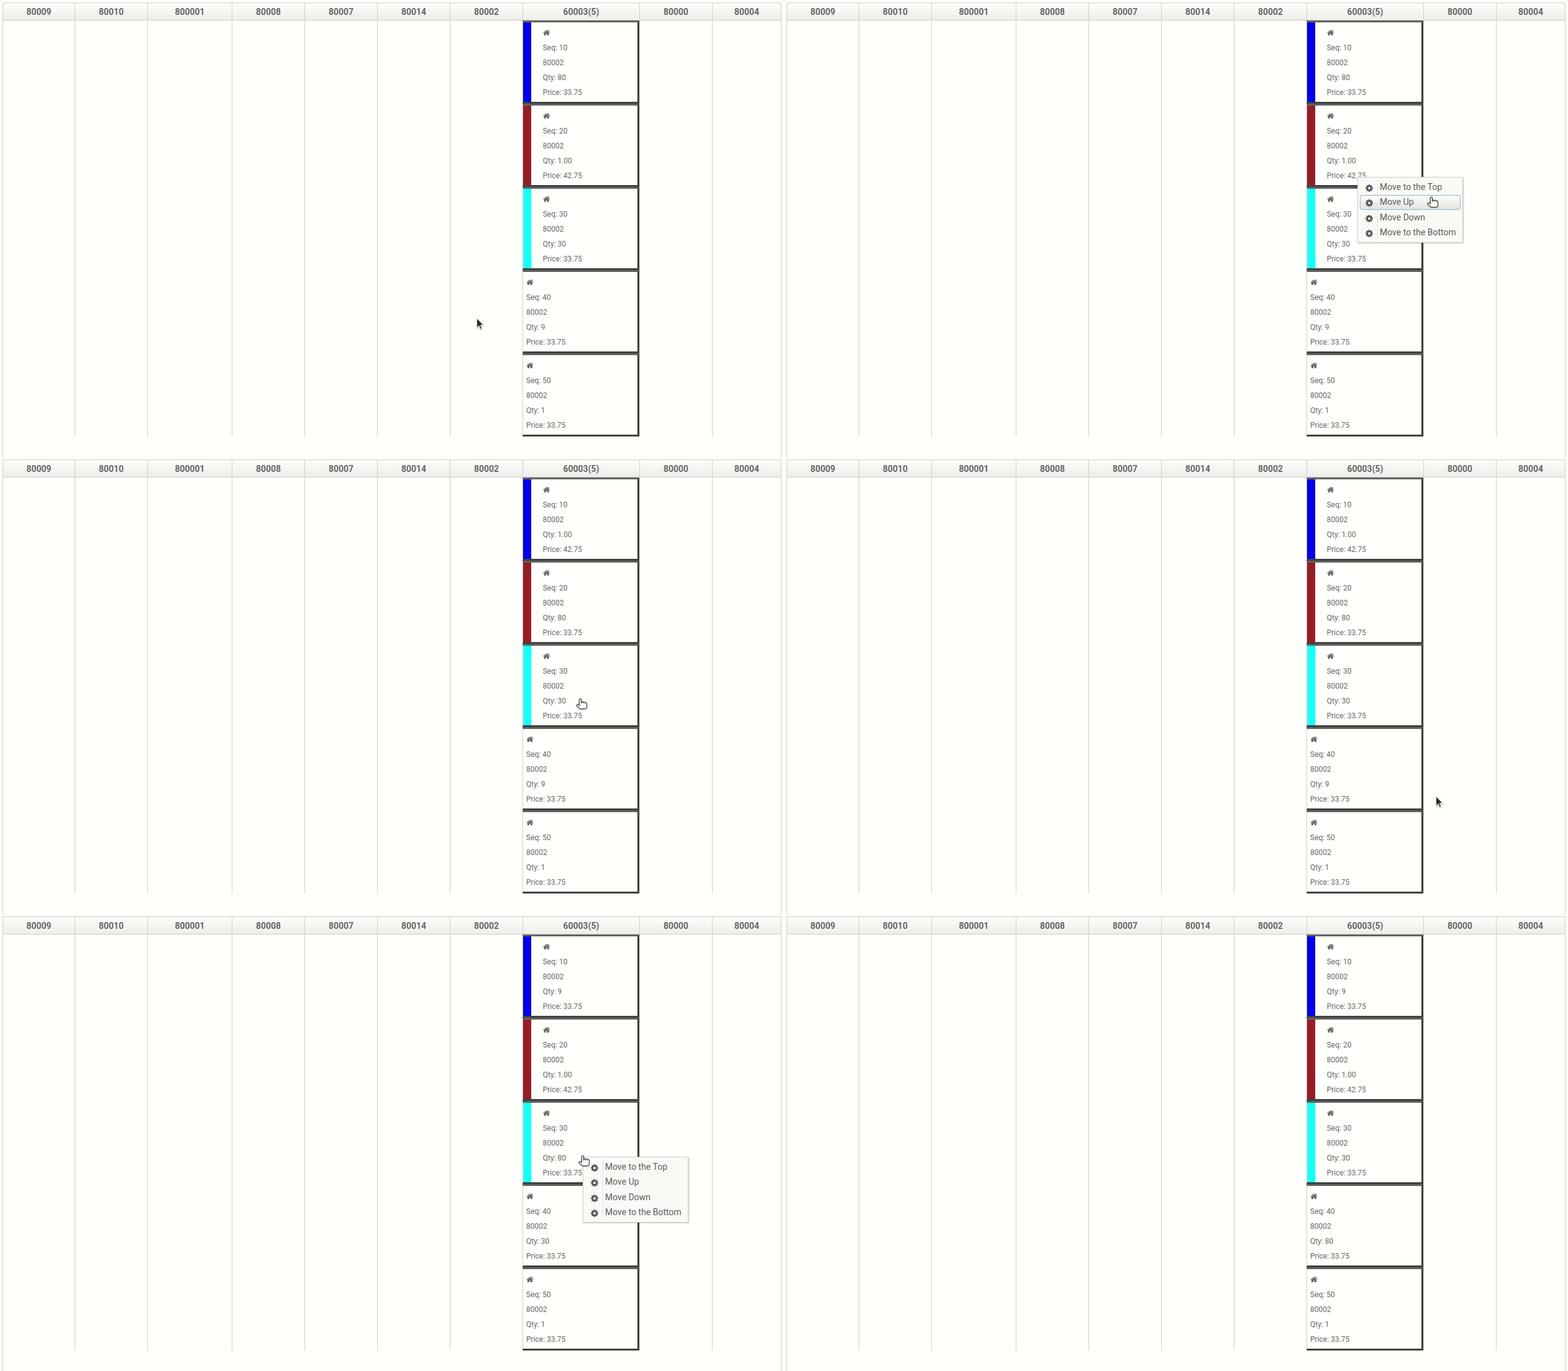
When you set a priority rule using an integer column from the table utilized for the kanban, the kanban board allows you to adjust the priority value within the kanban itself. To accomplish this, simply right-click on the desired card and select your preference: move to the top, move to the bottom, move up, or move down.
Depending on your choice, the associated record will modify its priority value relative to the adjacent card (either top or bottom), thus reordering the kanban accordingly.
Kanban Card Content
To set the text that will be displayed in the cards, the field Kanban Board Text must be filled like this:
- The text that is going to be displayed getting values from the database must be between '@' with the name of the field.
- If it is a field of a foreign table, you must type the name of that table followed by a '.' and the name of the field, all that between the '@'
- If you check the HTML flag you can format the text with HTML and it will be displayed properly in the card
- You can show text obtained from a SQL statement (only for advanced users). To do this add the SQL statement between @SQL= and ENDSQL (See image below).
- Any other text that doesn't meet these parameters will be printed without format in the card
In the case of fields with data type: Date and amount, you can also send the format you want to use for it between <> before the final @.
Status
This tab allows you to configure the different states of the board. You can create an Alias for the state, that alias will be printed instead of the name in the kanban board.
If you want you can limit the number of cards in a state, this limits the W.I.P. The Seq Value determines the order of the columns in the board. If you click isShowOver, the board will display all the cards in that state, even if they exceed the maximum amount previously defined, in this case, the column header will be painted red.
You can set a final state by setting isShowOver='N' and Max number of cards -1. This will cause that every card dropped in that state won't be shown.
If you want to create a rule to place the cards in a queue instead of its column, the SQL Statement field does that. You can set any kind of rule that can be into a where clause in a SQL statement.
For example, If you want to show in the queue all the cards that don't have a Business Partner associated, you must fill the field with C_BPARTNER=NULL, it'll place all the cards in the status column but additionally, it will create a new column on the left that represents a queue from the actual state, the cards in the queue column can not be moved, it will move automatically once you satisfy the condition that was set for it. You can also set up that cards are shown in the queue if the cards in that state exceed the max number of cards allowed for it, in this case, you must fill that field with the letter C (Card).
Priority
Here you can configure the priority, you assign a color to each range defined by the priority rule.
Status Configuration
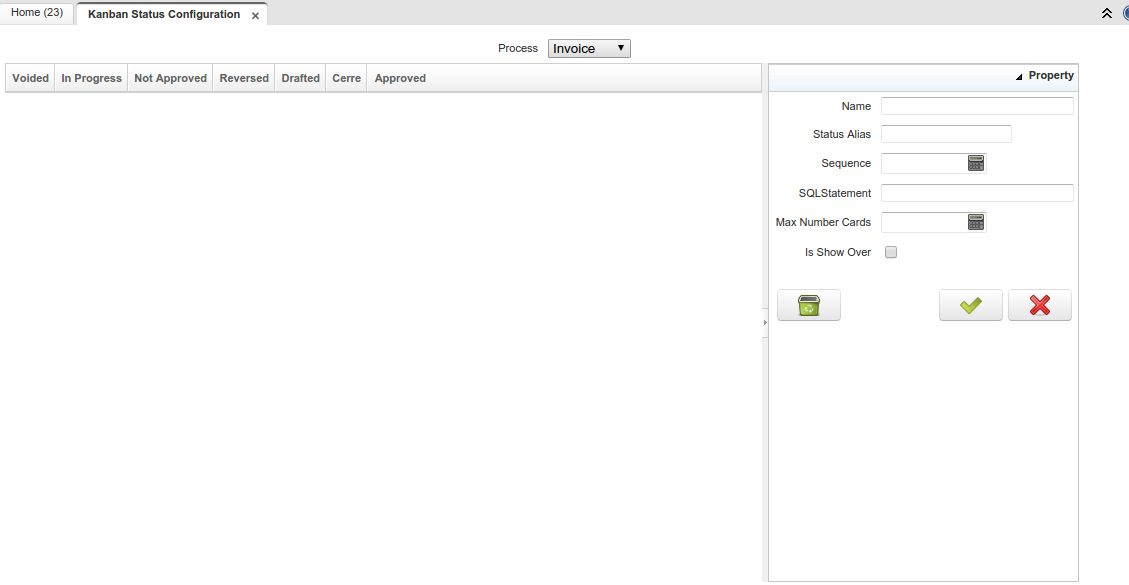
This window lets you sort and set the state's parameters, here you can modify the values of the columns in a friendly way.
You can change states order by drag and drop.
When you click a column, the right panel shows all the properties of that State, you can edit those values. If you drag a state and drop it in the trash can, this state will be deleted.
Usage
The Kanban Board window allows you to interact with the pre-configured boards. A list of available boards is shown (if pre-configured).
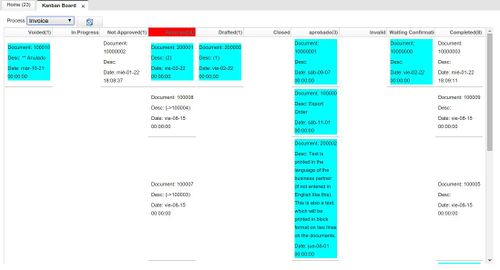
When you select one of the boards, the associated kanban board is displayed with each column corresponding to a state, and each card to a record of this process that is currently on that state.
You can move the cards between different states if you want it if it doesn't violate any workflow, the card state's value will be updated.
You can zoom into the document by double-clicking on the card.
You can set different types of boards (Even if they're not Kanban Boards), like sales report by vendor
Improvements In Recent Versions
The Kanban Board window presents the following improvements:
- Now it is possible to see which components you can interact with since the cursor changes when it is over a card that can be moved.
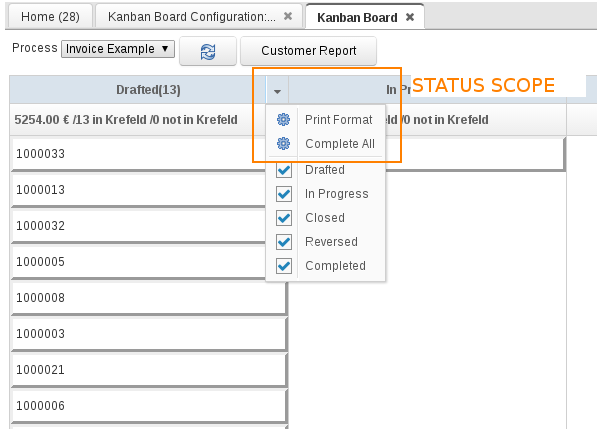
- Each state has a menu that is displayed when clicking on the button located on the right side of the column, the menu shows the list of configured states for the board, when you click one of the items the corresponding column is hidden.
Kanban Board 2.0
This is the new version of the Kanban Board, it has new features, it is in a beta version. Please feel free to use it, test it and any feedback that you want to share with me will be highly appreciated.
Summary
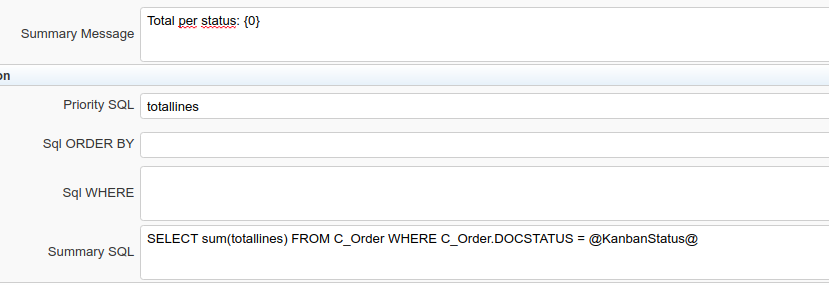
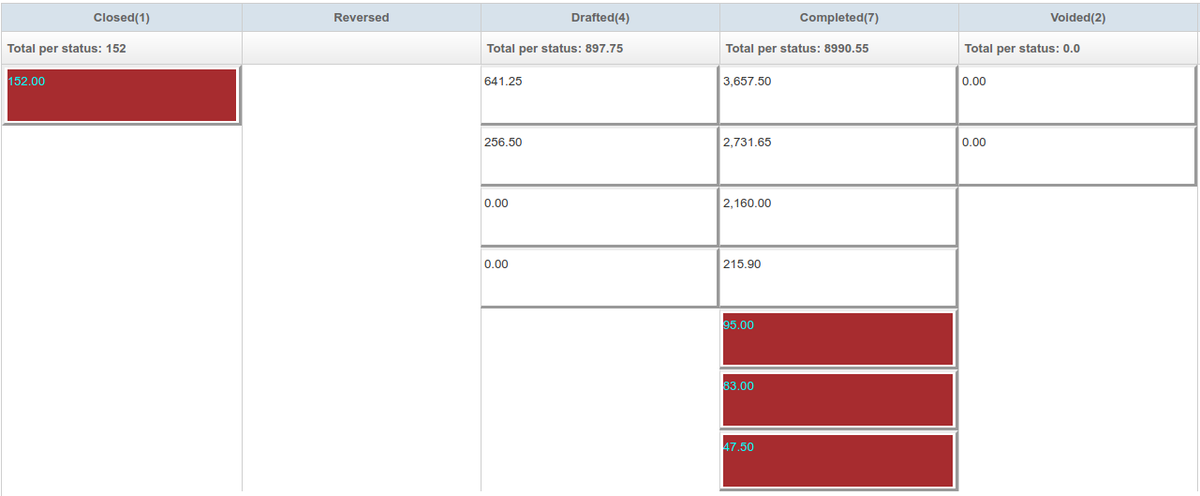
Now it is possible to have a summary in every status, let’s say you configured your kanban to check the different invoices in different status. With this new feature, you can see any information that you want to see in the header of the status. The field is filled by a SQL clause you can do anything there! In the image below you can see a kanban for the invoices that summarize the total amount of all the invoices in every status.
How to do it?
Fill the Summary SQL with a query like this: Select Something1, Something2 FROM (The table you defined for the Kanban) JOIN … WHERE (StatusColumn) = @KanbanStatus@ AND …
Fill the Summary message with the corresponding message, it is filled like the message text field in the Message window, you must parse the columns that the summary SQL return with {#column}.
Do not use an alias for the main table in the FROM clause
- StatusColumn must be replaced with the corresponding column that was chosen to set the statuses.
- @KanbanStatus@ must be written exactly like that to parse the real values for every status.
e.g.
@SQL=SELECT SUM(totallines) || ' €' AS totalamount FROM C_Order WHERE DocStatus = @KanbanStatus@
edit: In the new version the @SQL= is optional
The result will be something like the following
Process within Kanban
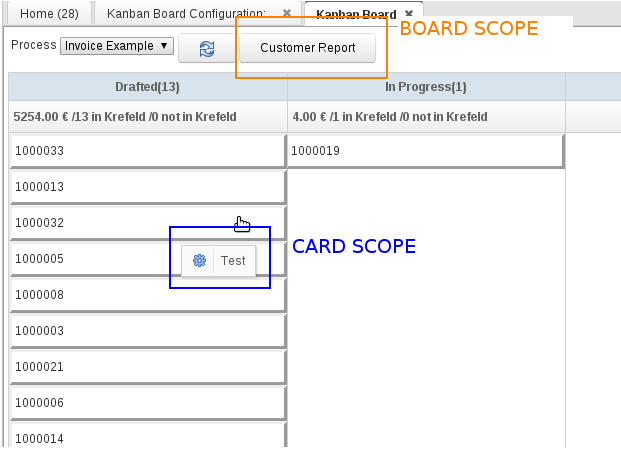
This feature is intended to make things simpler, you already can see your info in a general way, but what if you want to process it (individually or in batch) from the Kanban Board. It is now possible. For this new feature you will be able to configure process that can affect cards in the whole board, cards in a single status, or a single card.
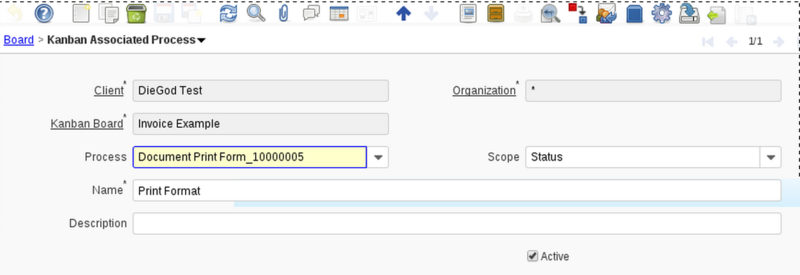
You can set them up in the new tab Kanban Associated Process
Select the process you want to run within the Kanban in the process field.
In the scope field, you can select if the process will be run for the board - status - or card.
The process works the same as in Info Window depending on the T table. to use the process you must do something like
The process will open the normal dialogue as every other process in iDempiere and will ask for parameters if needed.
When running a process from a card, a context variable @KDB_Record_ID@ is set. If you want your process to fill a parameter with that default value, just write that in the Process>Parameters>Default Logic field.
Complete All Cards in a specific status
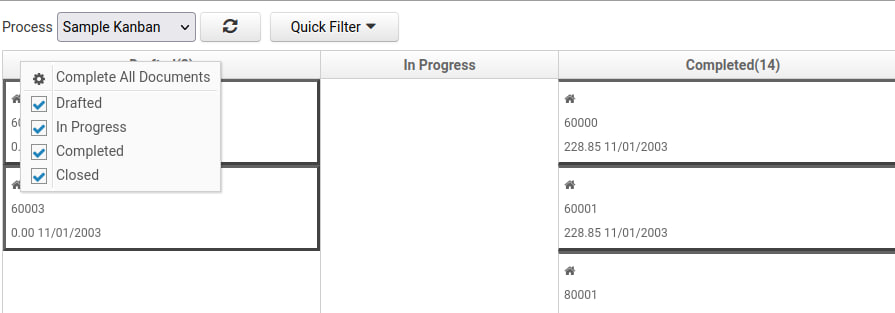
If the kanban board you're using is configured to have the Document Status column as the status column. You will see a status process Complete All Documents when opening the status menu.
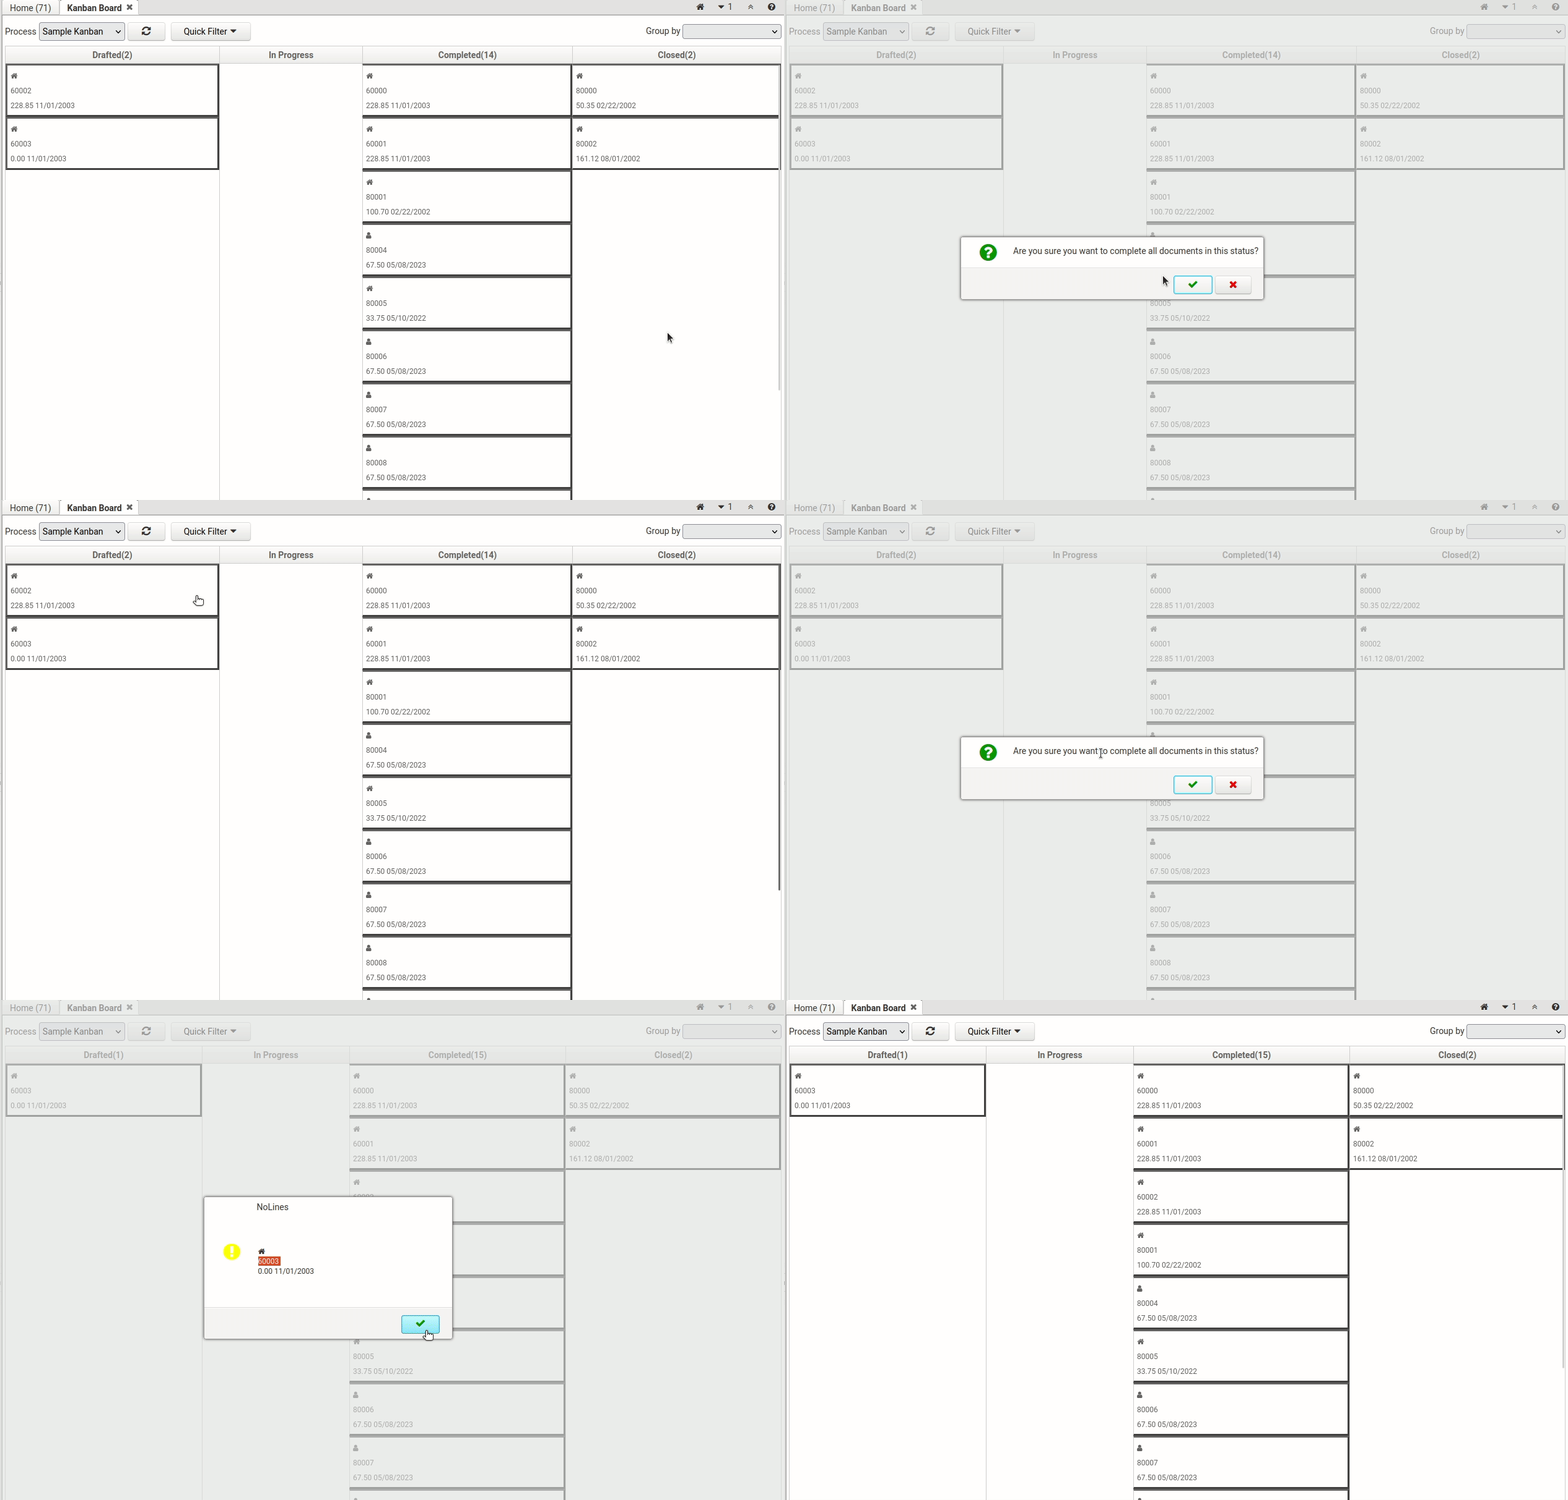
When you click on it, the system will complete all cards, that are not in the queue, of the selected status. It will iterate over the cards and show an error message if one of the cards cannot be completed. (Note: All cards completed before a card fails will remain completed and will be moved to the Completed status).
If there's an error, the system will display the error message and abort the process.
Before completing the system checks if: a) The status transition is allowed. b) A Completed status column exists and is active in the Kanban board.
Configurable text color on cards
This feature can be used to add contrast to text if you set a priority color to identify certain cards easily, but the background color of the card is too dark, the black color for the text can be hard to read. Now you can choose the text color also to create a nicer contrast in the cards.
Just fill the 'Text color' field in the Kanban Priority tab.
And you will be able to see the new text color on your board.
Setting the standard card size
Now you can configure the size of the cards in a Kanban board. You can set the Height and the Width, thus, all the cards will be displayed with the same size in the board. Just fill the fields 'Standard Column Width' and 'Standard Card Height' with the desired values.
If the card content exceeds the chosen size, a scroll bar will be placed in the card to navigate through the content. If you don't fill these values, the cards will behave as default in ZK.
Kanban Board Auto Refresh
Sometimes you want to let a screen open and check from time to time how your processes are performing on a day. With this new functionality (contributed by Alan Lescano), you can configure the Kanban board to auto-refresh every certain amount of time. Allowing you to see changes in the process flow without interacting directly with the system.
Configure a SysConfig 'KDB_KanbanBoard_RefreshInterval' with the time set in milliseconds as shown in the image below.
Kanban Board Parameters
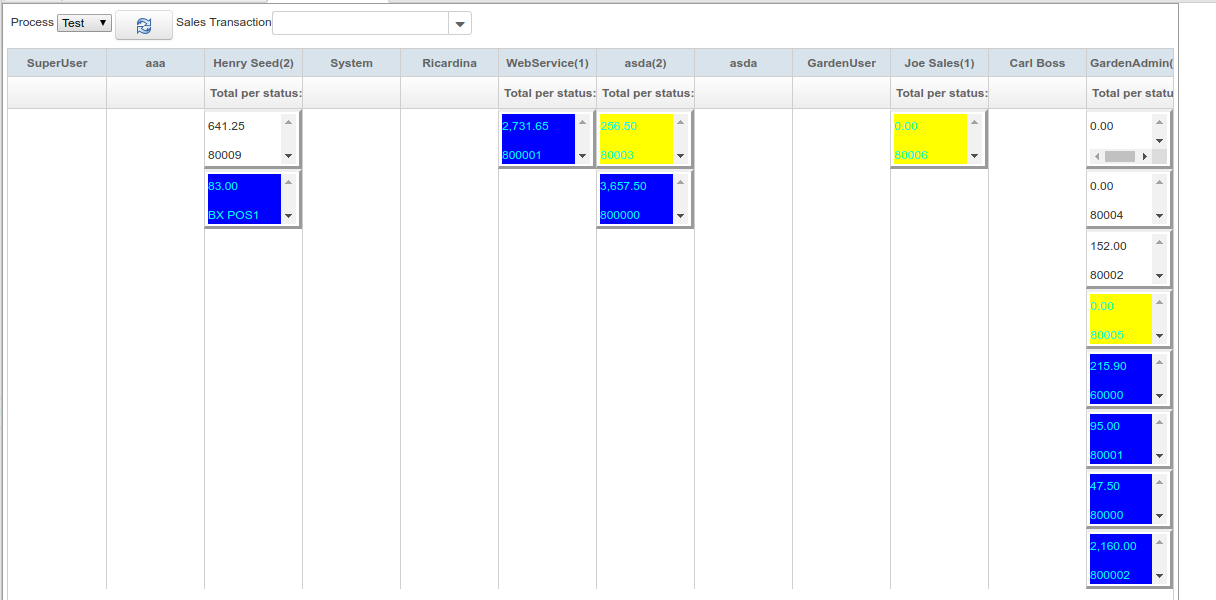
This new feature (Sponsored by cloudempiere.com) allows the user to set parameters in the Kanban Board and have quick filters on the existing boards, from now on you can set your kanban as usual and configuring the parameters you have more flexibility on filtering the cards you want to see.
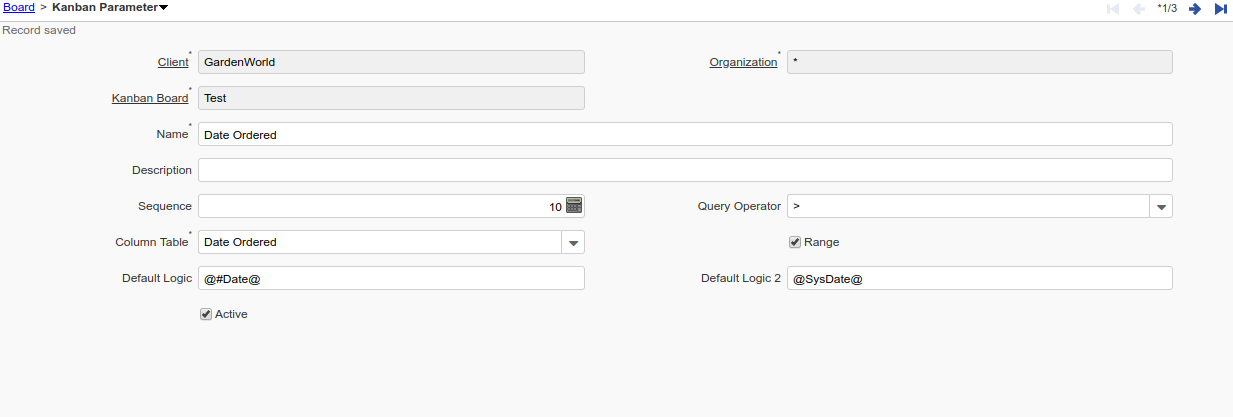
In order to configure the parameters, navigate to the new Kanban Parameter tab and fill the fields:
- Sequence: in which order you want to see the parameters.
- Column Table: Select the column that you want to use to filter the results.
- Query Operator: here you can select which kind of comparison you want to make against the selected column (equal, less than, greater than,...).
- Range: Checkbox to define if a parameter has a range.
- Default Logic: You can set the default logic of the parameter, for example, the login date with @#Date@. This field does not support SQL statements
Once the parameters are configured, open the kanban board, if you configured just one parameter, you will see it next to the refresh button.
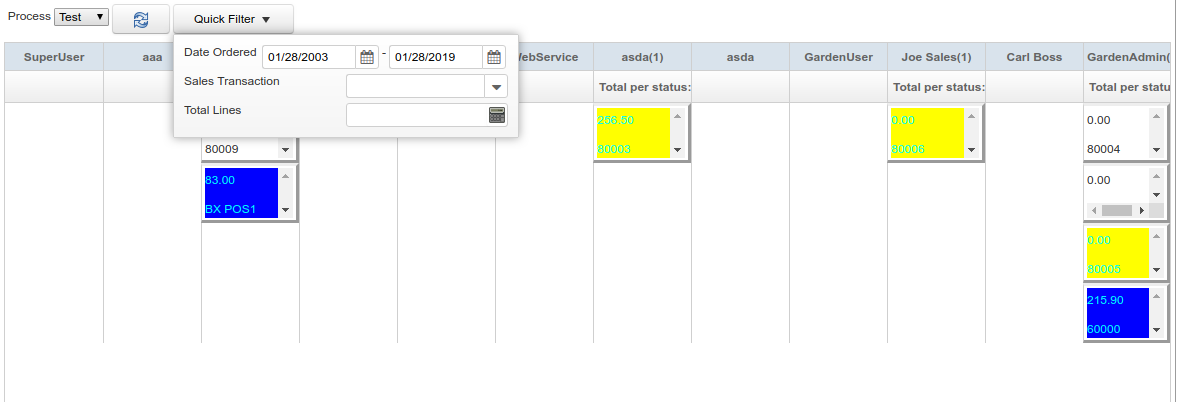
When there is more than one parameter, you'll see a button "Quick Filter" that opens a dialogue with all the parameters for you to set them.
If you don't want to group all the parameters in a single button, set the SysConfif 'KDB_GROUP_PARAMETERS' to N and the parameters will be shown in the top panel.
When you change the parameters, the board will show only the cards that satisfy the selected parameters.
Swimlanes
Kanban swimlanes are horizontal lines that split a Kanban board into sections. Teams usually use them to visually separate different work types on the same board and organize homogeneous tasks together.
A simple example of a Kanban swimlane would be the separation of different product types (“Hardware” and “Services”) of your procurement team. In this case, separate swimlanes give you a better overview of the workload per product type and help you achieve a better flow.
How to configure the swimlanes
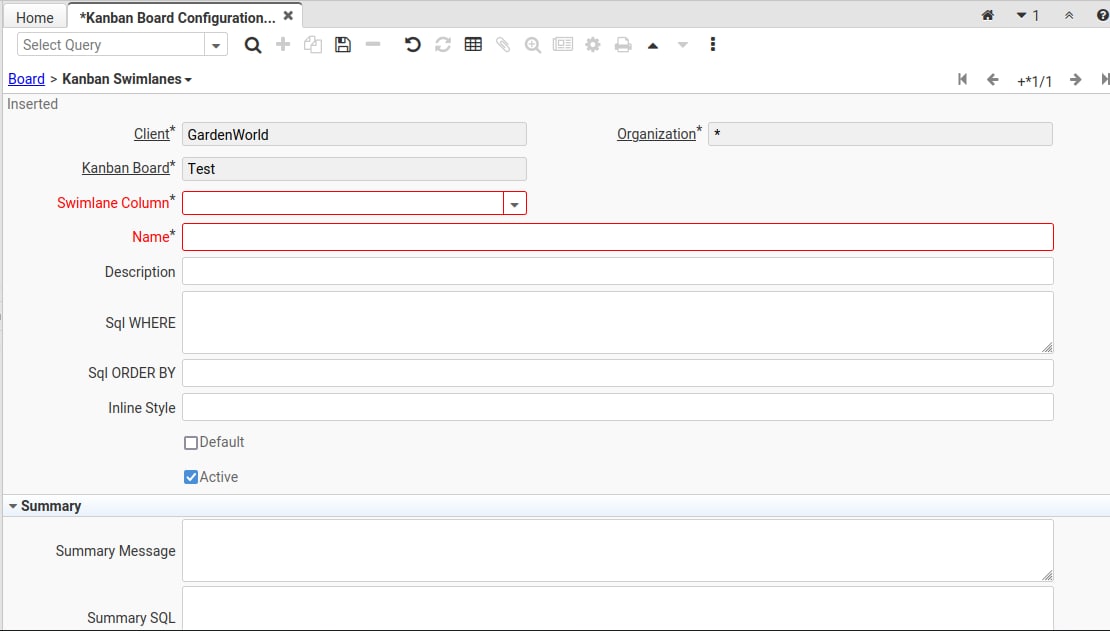
Open the new Window “Kanban Board Configuration” Window and navigate to the new Kanban Swimlanes tab.
Fill the fields as follow:
- Swimlane column: a column that will divide the cards vertically.
- SQL Where: Filter the swimlanes that will be shown.
- SQL Order By: Order BY clause
- Inline Style: CSS style used for the swimlane headers.
- Default: Default swimlane selected when opening the kanban for the first time.
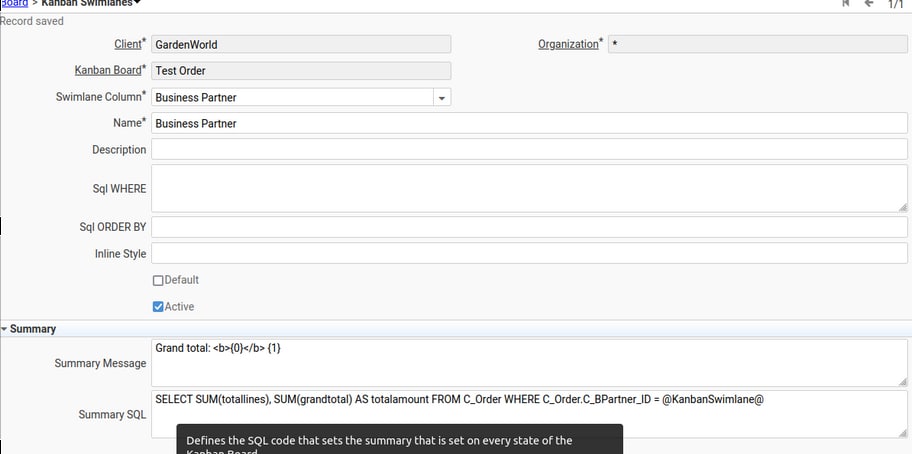
- Summary Msg = Message to be displayed under the swimlane name. It must be filled as: Regular strings, {n}: replaces the SQL columns queried in the Summary SQL text. It supports HTML and will be rendered accordingly.
- Summary SQL: Must be a SQL statement with a fully qualified where that includes the syntax [tableName] [SwimlaneColumn]=@KanbanSwimlane@.
For instance the following configuration:
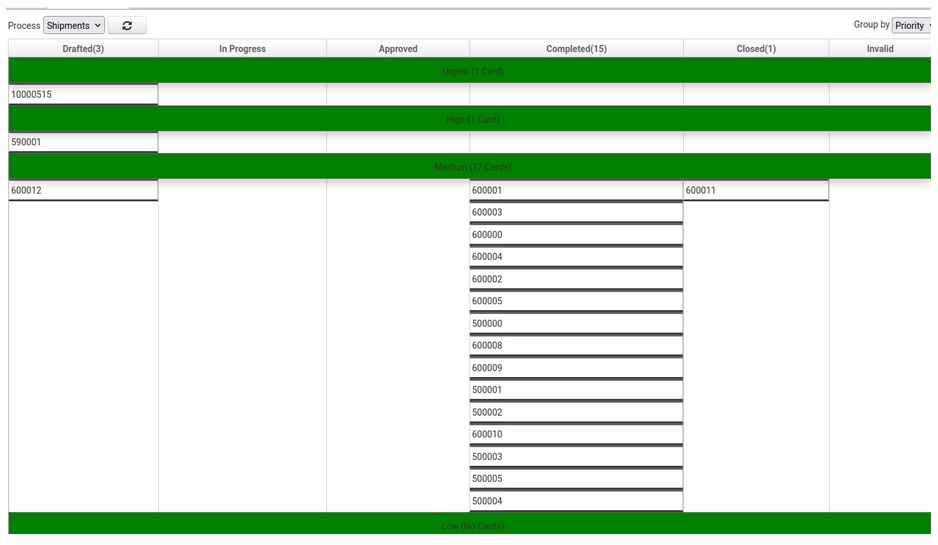
Gives the following result
Usage
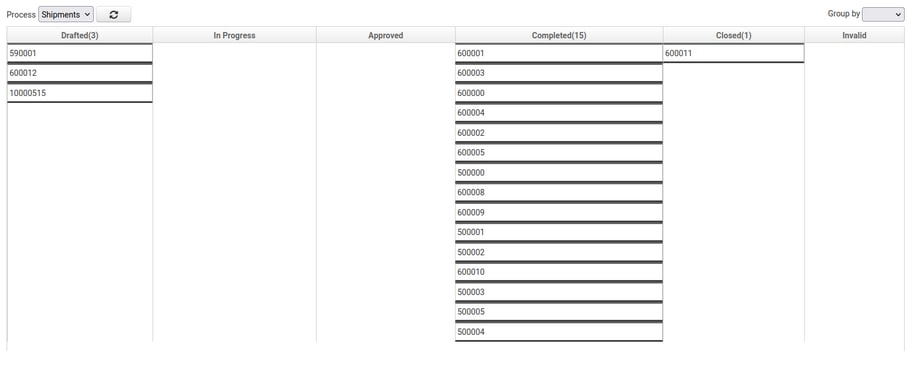
Open the Kanban Board you just configured. You will see a Group by selector in the top right.
Once you select an option from the drop down you will see the Kanban Grouped by the corresponding column
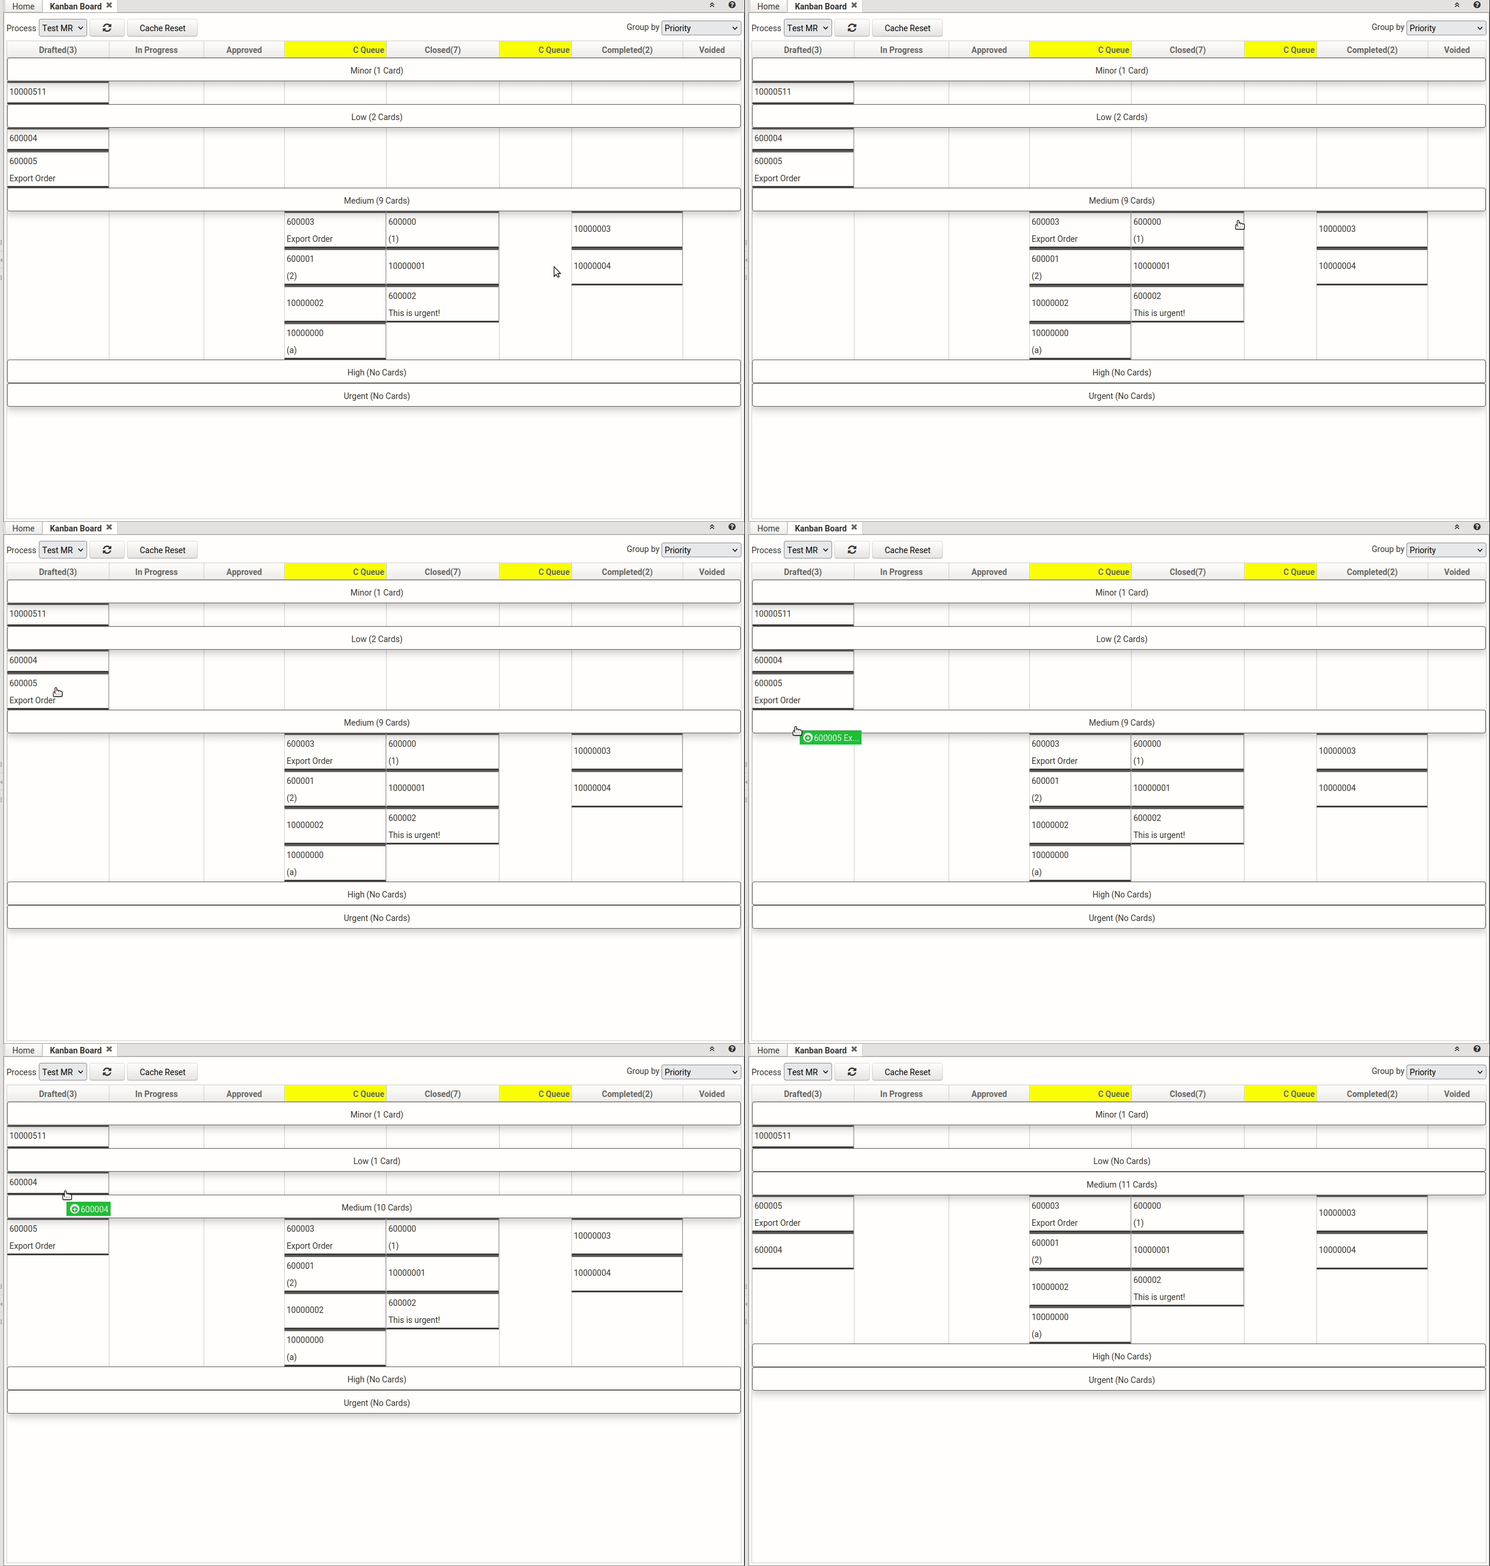
You can move a card from a swimlane to another (if it is allowed by the system. F.i no complete documents can be updated). By dragging the card and dropping it on the swimlane header or on a card/empty cell
How to Install
Felix console
To install the plugin using the Felix console you can download the plugin jar directly from here and use the Felix console to install as usual.

